The
Arduino C Programming Language Basics
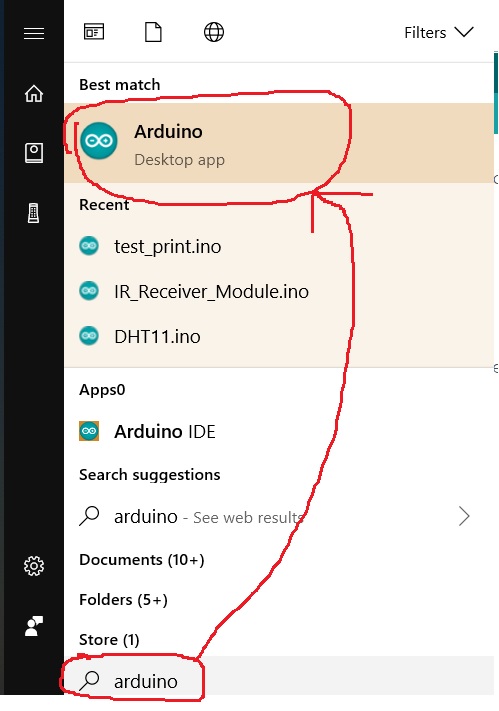
1. Start the Arduino IDE
Go to the start menu, type 'arduino', click the App shows up as
follows:
Here is the next window you will see on your side:
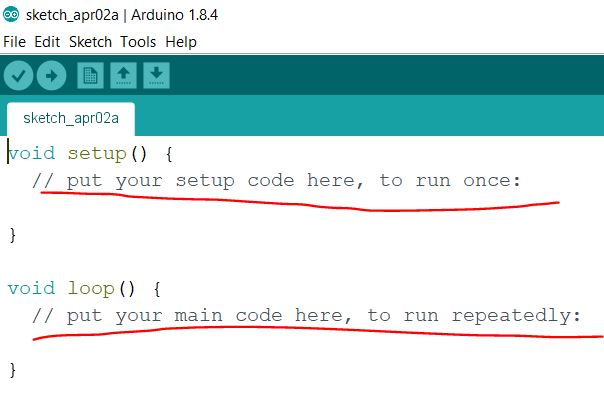
The Arduino IDE already put two functions there for you to fill up with
your code. One is 'void setup()', the other is 'void loop()'. They both
have a title of 'void' because they are not returning anything after
the function executed. Well, it's fine to not understand what is
'return' now.
The 'setup()' function will run for only once but the 'loop()' function
will be ran repeatedly. This enables the automation of an electronics
application. A lot of times, if you want to automate a procedure, you
must re-check the status and provide a corresponding response. This is
how computers automate things. It is a little different from human's
brain.
2. The Arduino C language
basics
2.1 Variables and Data
Types
In arudino programming in C language
In your sketches, most of the
times you want to store data and perform some type of calculation.
Counting the number of times a button is pushed, storing the voltage on
an analog pin, or performing a complex mathematical calculation with
vectors: require data to be calculated and stored. This data is saved
in a variable, a memory
location that can be changed as required. By declaring a variable, you
are asking the compiler to allocate a specific amount of memory,
depending on the data typeData types and variables are used to store
the information. When we declare variable we are actually telling
compiler to allocate a specific amount of memory, depending on data
type.
Below is a list of the data types commonly seen in Arduino, with the
memory size of each in parentheses after the type name. Note: signed
variables allow both positive and negative numbers, while unsigned
variables allow only positive values.
* boolean (8 bit) - simple logical true/false
* byte (8 bit) -
unsigned number from 0-255
* char
(8 bit) - signed number from -128 to 127. The compiler will attempt to
interpret this data type as a character in some circumstances, which
may yield unexpected results
* unsigned char (8
bit) - same as 'byte'; if this is what you're after, you should use
'byte' instead, for reasons of clarity
* word (16 bit) -
unsigned number from 0-65535
* unsigned int (16
bit)- the same as 'word'. Use 'word' instead for clarity and brevity
* int
(16 bit) - signed number from -32768 to 32767. This is most commonly
what you see used for general purpose variables in Arduino example code
provided with the IDE
* unsigned
long (32 bit) - unsigned number from 0-4,294,967,295. The most common
usage of this is to store the result of the millis() function, which
returns the number of milliseconds the current code has been running
* long (32 bit) -
signed number from -2,147,483,648 to 2,147,483,647
* float
(32 bit) - signed number from -3.4028235E38 to 3.4028235E38. Floating
point on the Arduino is not native; the compiler has to jump through
hoops to make it work. If you can avoid it, you should. We'll touch on
this later.

2.2 Operators
(More details can be found on Arduino's website: https://www.arduino.cc/reference/en/)
Arithmetic
Operators
% (remainder)
* (multiplication)
+ (addition)
- (subtraction)
/ (division)
= (assignment
operator)
Comparison
Operators
!= (not
equal to)
< (less
than)
<= (less
than or equal to)
== (equal
to)
> (greater
than)
>= (greater
than or equal to)
Boolean
Operators
! (logical
not)
&& (logical
and)
|| (logical
or)
Pointer
Access Operators
& (reference
operator)
* (dereference
operator)
Bitwise
Operators
& (bitwise
and)
<< (bitshift
left)
>> (bitshift
right)
^ (bitwise
xor)
| (bitwise
or)
~ (bitwise
not)
Compound
Operators
%= (compound
remainder)
&= (compound
bitwise and)
*= (compound
multiplication)
++ (increment)
+= (compound
addition)
-- (decrement)
-= (compound
subtraction)
/= (compound
division)
^= (compound
bitwise xor)
|= (compound
bitwise or)
More
about the language itself:
Sketch
Further
Syntax
#define (define)
#include (include)
/*
*/ (block comment)
// (single
line comment)
; (semicolon)
{} (curly
braces)
2.3
Control Structures
Control
Structure in Arduino
programming in C Language
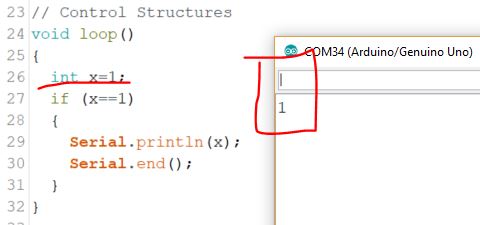
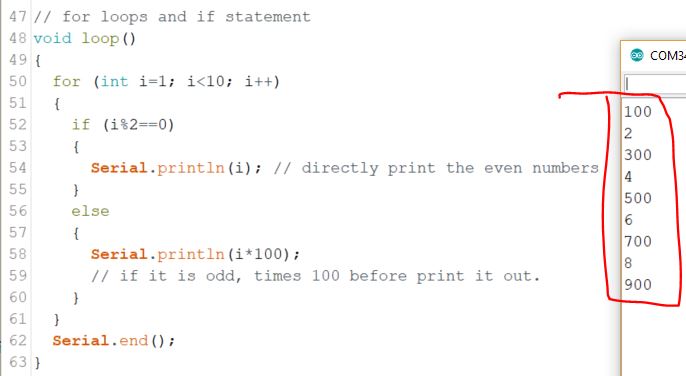
if Statement in C Language:
The if statement is used to detect if an expression is equal to a result
Following versions are used.
One is:
if
(expression)
{
statement;
}
Two conditions are as follows:
if
(expression)
{
do_this;
}
else
{
do_that;
}
We can mix several if else statements
using:
if (expression)
{
do_this;
}
else if (expression)
{
do_that;
}
Try to evaluate a given program:
int
var1 =
42;
if
(var1 == 42)
{
run_this; // var1 equals 42; this function will be executed
}
else
{
run_that; //This one will not
}
if
(var1
< 50)
{
run_another_function; //This will be run, since 42 is less than 50
}
Switch
Statement in Arduino programming in C Language
When
we need
to check a large number of conditions and need
to execute a statement according to a specific condition, we use
switch/case
statement. It is like if statement. A switch statement the value of
variable,
and execute a different case statement depending on value.
switch(button)
{
case
1:
turn_on_lights();
break;
case
2:
if
(blinds_up ==
false)
{
raise_blinds();
blinds_up = true;
}
break;
case
3:
----
}
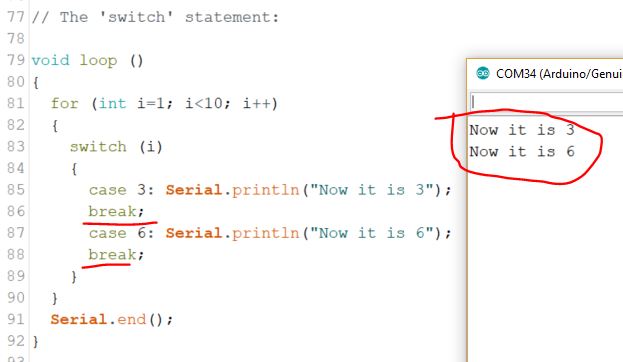
Break:
at the
end of each instruction actually tells
compiler to stop the execution. If 'break;' is not used, it will
continue
executing the case instruction. For example if button 4, 5, 6 do same
task
you can
write
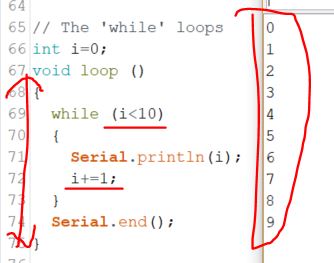
The 'While Loop' in Arduino
programming
It
is one of
the basic loops of C language; it will execute
same code again and again until a condition is specified. As long as
condition
is true it will continue running same code and keep checking the
condition at
the end of each loop.
while
(button == false)
{
button = check_status(pin4);
}
In
this
example, the function check status runs until it
returns true. When that happens, the variable button becomes true, and
the
while loop will be broken. It might be within a few milliseconds, or
the system
might wait indefinitely.
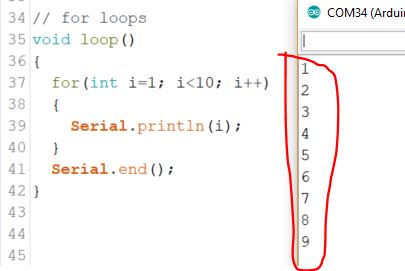
The 'For Loop' in Arduino
programming
In
cases in
which you need a portion of code to loop an
exact number of times, the for loop is used. It is similar to while,
only it is
written differently. The for loop keeps track of the number of times it
has
run.
for
(expression1;
expression2; expression3)
{
instructions;
instructions;
}
It
requires
three expressions:
•
expression1
is the initializer; it will initialize a variable.
• expression2 is the conditional expression; as long as this condition
is true,
the loop keeps on executing.
• expression3 is the modifier; when a loop is completed, this action is
performed.
For
example:
for
(int i = 0; i
< 10; i++)
{
myfunc(i);
}
In
this
example, a variable is defined with the name i. The
variable is set to zero, and each time the function myfunc is run, i is
increased by one. Finally, when i reaches 10, the loop stops before
running
myfunc. This saves you from writing out all the commands one by one
like this:
myfunc(0);
myfunc(1);
…
myfunc(8);
myfunc(9);
2.4
Bit
Masks (examples are from this link)
Bit
masks are
used to access specific bits in a byte of data. This is often useful as
a method of iteration, for example when sending a byte of data serially
out a single pin. In this example the pin needs to change it's state
from high to low for each bit in the byte to be transmitted. This is
accomplished using what are known as bitwise operations and a bit mask.
Bitwise operations perform logical functions that take affect on the
bit level. Standard bitwise operations include AND (&) OR (|)
Left
Shift (<<) and Right Shift (>>).
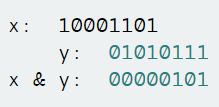
The
AND
(&) operator will result in a 1 at each bit position where both
input values were 1. For example:
The OR (|)
operator (also known as Inclusive Or) will result in a 1 at
each bit position where either input values were 1. For example:

The
Left
Shift (<<) operator will shift a value to the left the
specified
number of times. For example:
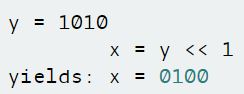
All
the bits
in the byte get shifted one position to the left and the bit on the
left end drops off.
The
Right
Shift (>>) operator works identically to left shift
except that
it shifts the value to the right the specified number of times For
example:
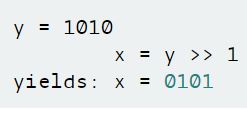
All
the bits
in the byte get shifted one position to the right and the bit on the
right end drops off.
3. Run your
code on the Arduino board
Since
all the programs are supposed to be ran on the Arduino board so we need
to download the code to Arduino, run it using Arduino's CPU and return
the result to our PC to see the results.
Keep
in mind that the Arduino board has a Atmel Mega 328 P microcontroller
unit (MCU), which has a CPU in side. You also have a CPU in your PC but
it is way more complicated than the CPU in the MCU chip.
We
are using the USB cable to talk to the MCU thorugh our PC. We can
easily download the Arduino C code to the board and let it run there.
However, if we want to see the result after the computation in the MCU,
we need the results to be sent back to the PC. Therefore we need the
USB cable to connect the board and the PC.
The communication
between the board and the PC is called UART or 'Serial Communication'.
It is fine to not understand what 'Serial' stands for. Just need to
know that you need the USB cable to send signals to and receive signals
from the board.
You need the following steps before you can talk to the board using
'Serial Communication'.
Go
to 'Tools' in the menu bar, make sure you selected the 'Arduino/Genuino
Uno' Port. I have COM34 for me, your COM port number will be different
from mine, just select it.
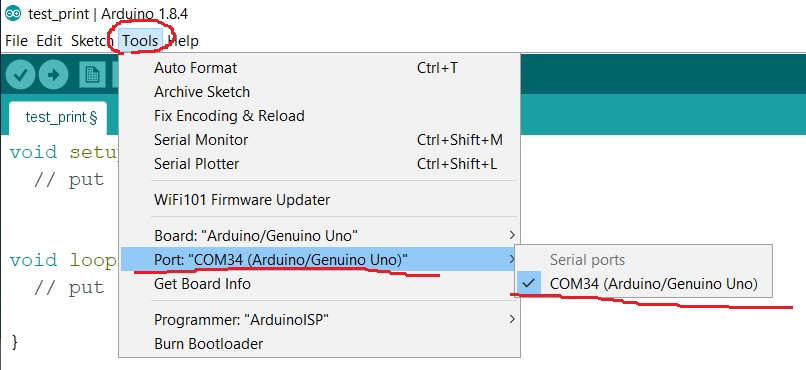
Connect the board and the PC using the USB cable.

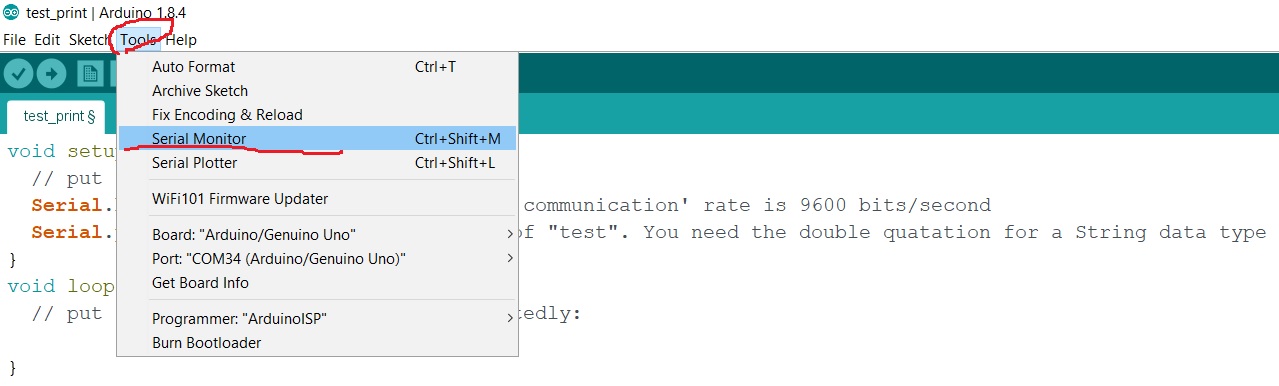
Open your Arduino IDE and start a new file:

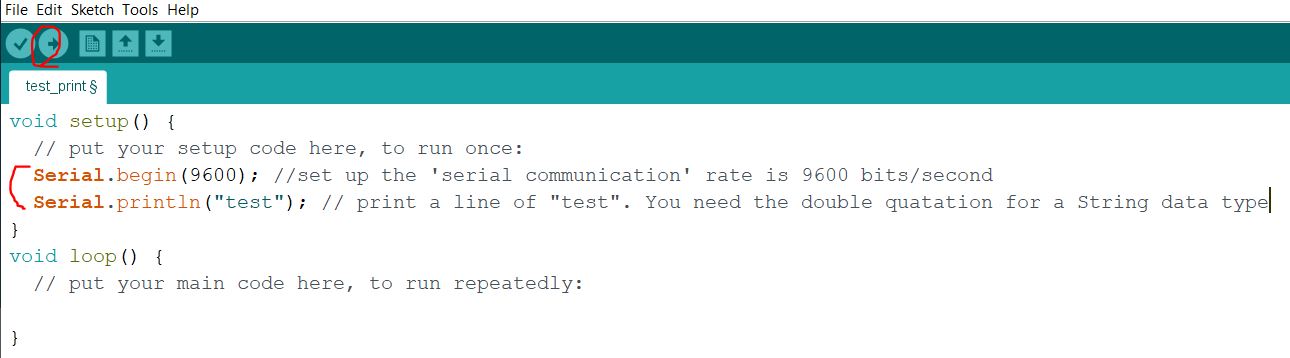
You'll see that in the serial monitor, the board will send 'test' to
you as you defined in the code.
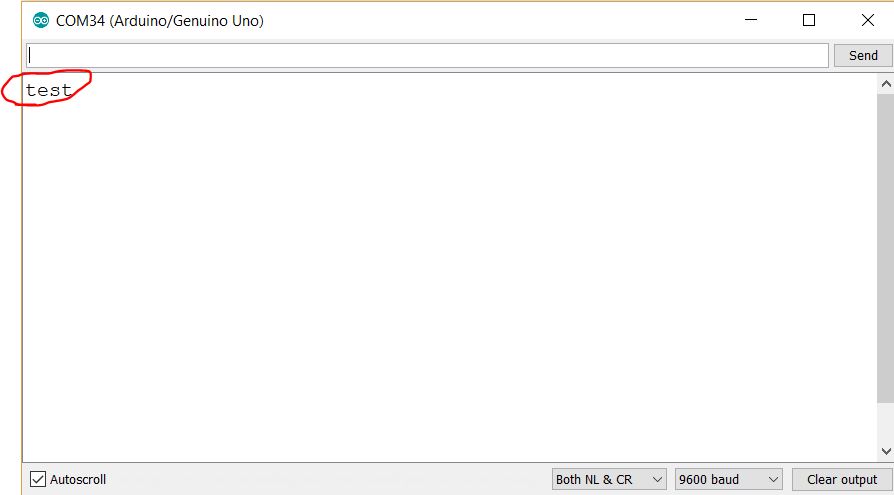
Since the 'setup()' function will be executed for only once, so you
only have one 'test' being printed out.
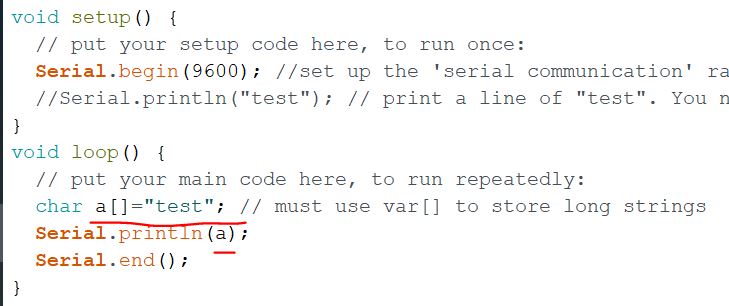
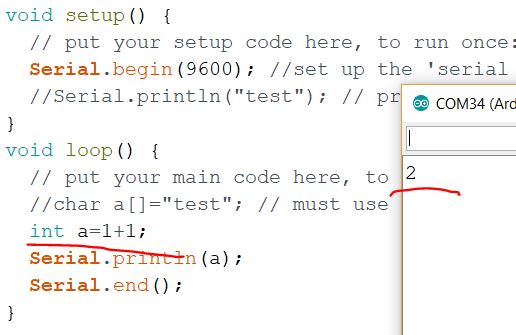
If you change the code as follows:

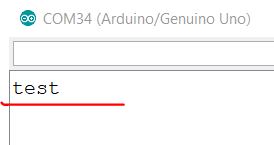
You'll see the results as follows:

However, this is a dead loop. If you don't unplug the board, it will
being executed permanently.
You can use the following code to bring it to the end after the first
execution:
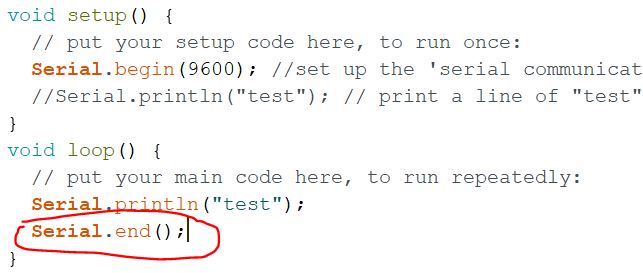
Even
though it is a dead loop, but I'll terminate the serial communication
in in the first loop. You will only get 1 "test" in the monitor by
using this code.
4. Test the code using
Arduino and the
serial monitor from your PC.
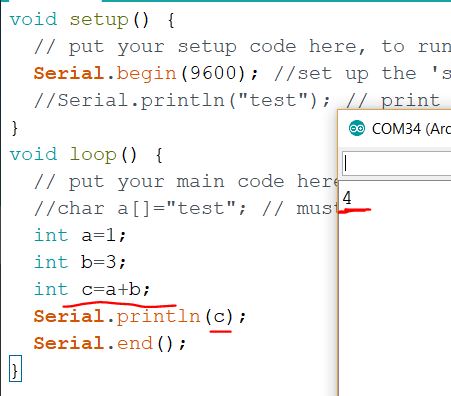
You'll get the expected result:
And from the results below, we know that we do have CPU in the Arduino
chip. It is able to perform these arithmetic operations:
One more example:
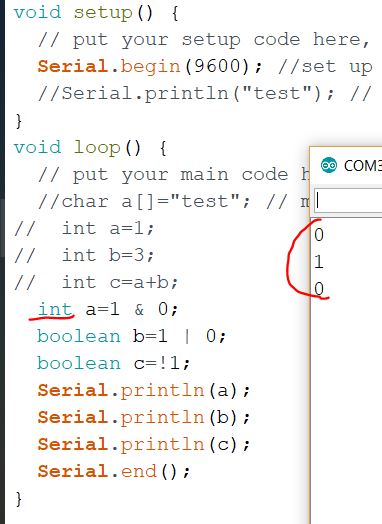
Let's test some logic operations:
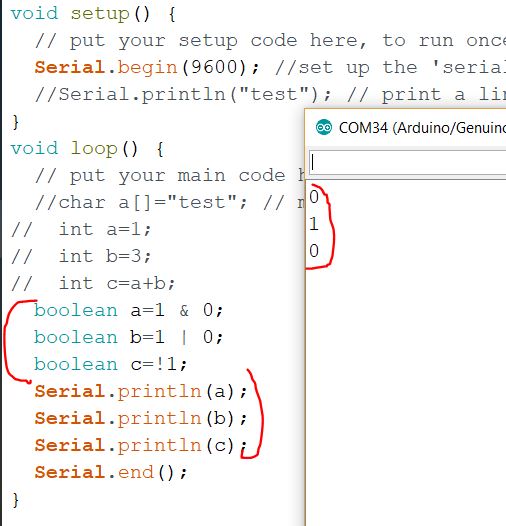
I changed one of the variables into an 'int' type and it didn't affect
the results:
5. Control structures and
loops
Use the 'if' statement
to make
a judgement before the execution of the code.
Syntax:
if
(expression)
{
do_this;
}
else
if (expression)
{
do_that;
}
else
(expression)
{
do_that;
}
The 'For' loops:
Syntax:
for
(expression1;
expression2; expression3)
{
instructions;
instructions;
}
Think about that: where should you modify if you want to print all the
numbers from 1 - 10?
An example have both the 'if' statement and the 'for' loop:
The 'while' loops:
Syntax:
while
(button == false)
{
button = check_status(pin4);
}
The 'while' loop can do the looping job as well but the format is a
little different.
You must be wondering when to use a 'for' loop and when to use a
'while' loop:
You have a 'void loop()' function already, why do you still need a
'while' loop to do the job?
The
'void loop()' function does not have a conditional judgement to control
the execution. You need a condition to check to control the loop.
So the question is will the 'void loop()' function run forever?
The
anwser is 'YES', as long as you get your board powered up, the 'void
loop()' function will start running to check if there is any
changes/updates in the condition. If there are any, the system will run
the corresponding code for this changed condition.
However,
here, after the coutner 'i' reaches 10 for the first loop in the 'void
loop()' function, the next time it enters into this 'void loop()'
function, 'i' doesn't satisfy the condition any more for the 'while'
loop, so the program inside the 'while' loop won't run.
The 'switch' statement:
Syntax:
switch
(button)
{
case
4:
case
6:
case
8:
//code
to be run
break;
}
Look
at the following example. Why the 'Now it is 6' will be executed for
twice?
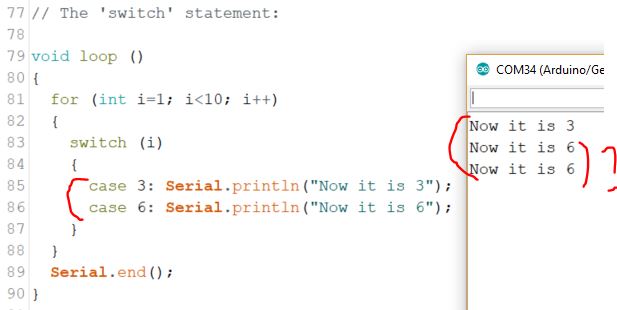
The
reason is the 'switch' statement works in the following way: the
'switch (i)' line detects the value of 'i' and enters the specific case
directly and then run all the rest of the 'cases' below this entry. So,
it entered 'case 3' and then run the 'case 6' after this. In the next a
few 'for' loops, when 'i' hits '6', it will directly enter the 'switch'
statement at 'case 6' and run it again. Therefore, you see two of 'Now
it is 6'.
In order to avoid this situation, we need to use the
'break' statement to exit the 'switch' statement after every 'case' so
the code below that entry will not be executed.
Tasks:
1.
Repeat all the examples in Sections 3, 4, and 5. Make
snapshots, save them as figures for the report. Add captions for the
figrues to explain the results. The example caption for a figure:
"Figure 1: The 'for' loop
example". Add some narative contents in the report to briefly explain
the results. (10 points)
2. There is another control function not mentioned in this tutorial -
'do while'. The Syntax is:
do {
something;
} while (condition);
Create one or a few examples to demonstrate how this function works.
Include this in your report. (include figures/captions and descriptions
for this design). (10
points)
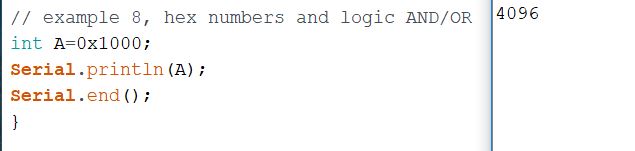
3. Use HEX numbers to represent multiple binary bits is very
conventient. The format is '0xFFF', which starts with '0x' (zero ex)
and followed by the HEX number.
I have the following code executed in Arduino. Repeat it on your side
and explain why the result is 4096? (10
points)
4. Use the HEX format (0x.....) (16 bits)
to
represent the following numbers: (keep in mind there must be 16 bits in
your result) (15
points)
(a)
1000 1111 0011 0101 (binary)
(b) 55 (decimal)
(c) 11 (binary)
5. Convert the following HEX format into Binary: (15
points)
(a)
0xFFFF
(b) 0x3210
(c) 0xABCD
6. Display the lower 6 bits of an 8-bit data to PORTB in parallel. (use
a pointer variable to represent PORTB) (20
points)
To learn more about pointers, this tutorial on C++ does a very good job on explaining it.
volatile uint8_t* p = &PORTB;
*p = data;// 0xAA, 10101010, access the port through the
pointer variable and assign it a new value.

7. Modify the code by using bitwise XOR to for a display pattern shown
in the follow video.
Declaring the variables and managing the setup function could be something similart to the following:
byte data =170; // 0xAA, 10101010
byte mask = 0xFF;
volatile uint8_t* p = &PORTB;
void setup() {
DDRB = 0xFF ; // Port B outputs
}
The
DDRB register on the ATMEGA 328, which controls whether certain GPIO
pins are inputs or outputs, is a single byte at location 0x04. To set
the pins as inputs or outputs, you simply write a value between 0 and
255 into that locationSo if you want all eight pins on Port B to be
inputs you’d simply write 0 to DDRB (in binary, 0b00000000). If you
want them all to be outputs, you’d write 255 (in binary, 0b11111111).
More
details can be found in the ATMega 328p datasheet. Here is a snapshot
from the datasheet regarding the two registers for PORTB.

8.
Use the following method to rechieve every single bit from a byte data
and send it to Pin 13 (time invervals are 1 s for each bit). (20
points)
for (mask = 00000001; mask >0; mask<<=1) // apply
an 8-bit mask
{
if (data & mask) // if it is
TRUBE/1
{
digitalWrite(pinNumber, HIGH);
}
else // if it is FALSE/0
{
digitalWrite(pinNumber, LOW);
}
delay(bitDelay);
}
-------------------------------
Arduino UNO pinout

-------------------------Resistor Code (Expect
a quiz on this) examples--------------------------------
