CE 351 Spring 2022
Homework 3
Name: David Lee Email:
djlee1@fortlewis.edu
LEDs
and SSDs
Introduction:
In this homework assignment we use Arduino to write code to make an
LCD, Sensors and Actuators work on a bread board.
Materials and Methods:
Using Arduino Software and hardware we perform a series of tasks that
make different patterns on the LCD, using different sensors
Results:
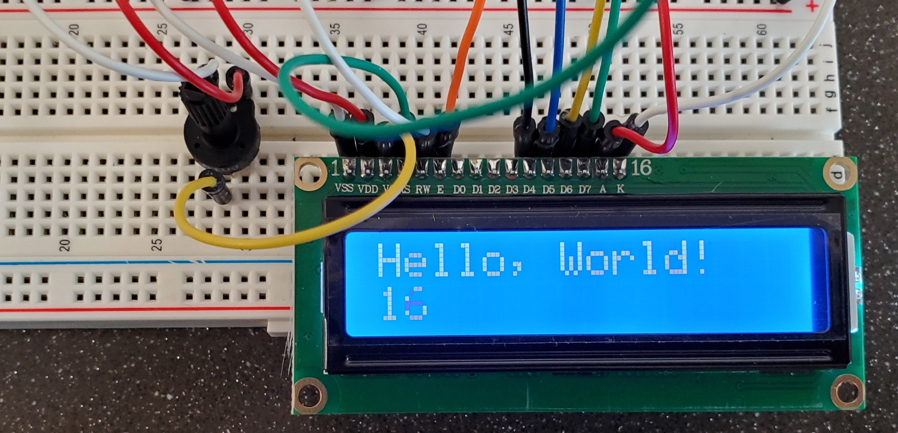
Task 1: Display "Hello
World!" on the LCD Display.
Figure 1: Show Hello
world on the LCD Display
Task
2: Count to 5 and then reset to 0 and
start over.
Figure 2: A video of the couting.
Task
3:Given
that the command 'lcd.clear()' will clear out everything on the LCD.
Modify the code to implement the scrolling text as presented in the
video
Figure 3: Shows the Video of the
Task
Task
4:Repeat
the work above, show room temperature on the LCD. Use your finger to
warm it up see if it changes
Figure 4: Shows theThermistor reading
the temperature differnce and printing on LCD
Task
5:Modify
the code to display in the form below. Simply blow at the sensor to
change the temperature and the humidity to test it. Show a
demonstration video in your report.
Figure
5: Shows the DTH11 working and the LCD Displaying both the
Temperature and Humidity
Task
6:Repeat
the work above to display temperature data from TMP36.
Figure 6: Shows the
video of the task Task
7:Modify
the example code to match your new remote controller
Figure 7: Shows the video of all
the keys working on the remote
Task
8:Repeat
the work in the demo video above, show your result in a VIDEO for the
report
Figure 8: Shows the barebone MCU
working to blink an LED
Task
9:Use
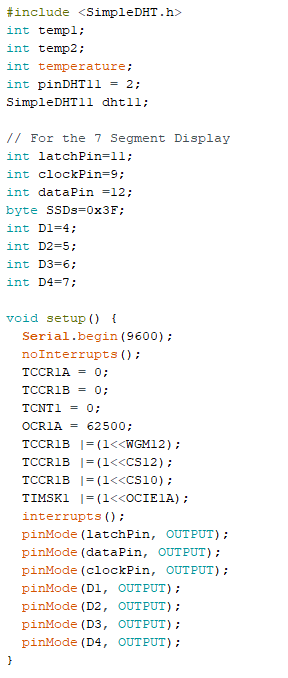
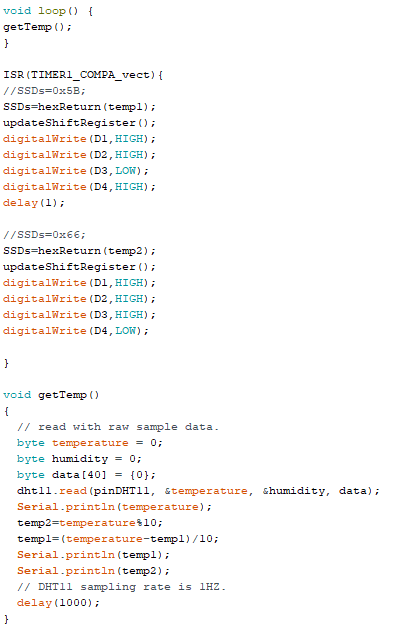
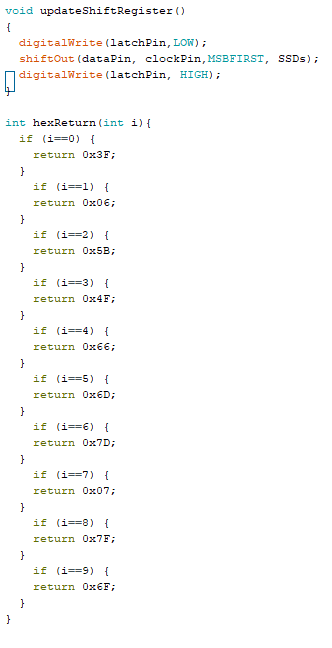
the barebone ATMega 328p to build a portable digital temperature meter.
Use an Interrupt Service Routine to update the temperature display. The
temperature/humidity sensor is the DHT11, the display unit is the
4-digit 7-segment display.
Figure 9: Shows the video to the DHT11 With 7segment display Figure 10: Shows the Code to the DHT11 With 7segment display Figure 11: Shows the Code to the DHT11 With 7segment display Figure 12: Shows the Code to the DHT11 With 7segment display
Discussion: This
was a great assignment to complete because it showed me what sensors
are available to use and how to use them with displays. The most
challenging task for me was task 9. As you can see in the video I am
able to accuratly get the ones place to show and display but the Tens
place only flashes for a short period of time which you can see in the
video. This shows that the DHT11 is working and outputing the correct
values I just couldnt get the code to loop and work correctly with the
7 segment display.