
Figure 1: Setup using arduino nano and DS18B20 temperature sensor.
Week 2-8
ATMega 328 Advanced Applications
Introduction
In this
lecture, we learned how to interface the MCU with an ESP8266
module, how to transfer the sensor's data to ESP8266 and display
it on an IoT platform like ThingSpeak, and how to intferface the
nano with the DS18B20 temperature sensor and the SSD1306 oled
module.
Task 1.1
In Task 1.1, we got started by using
the ssd1306_128x64_i2c example in the Adafruit SSD1306 library,
which displayed an animation, images, and texts on the SSD1306
oled module as shown in Demonstration 1.
Demonstration 2: Demonstrating of using only text from ssd1306_128x64_i2c example.
Task 1.2
In Task 1.2, we downloaded
the onewire and milesburtonTemp libraries. Then we
used the DS18B20 temperature sensor and the arduino
nano to read the temperature from the sensor and
display it using the serial
monitor as shown in Figures 1 and 2.
Figure 1: Setup using arduino nano and
DS18B20 temperature sensor.

Figure 2: Using the
nano and DS18B20 temperature
sensor to
display temperature.
Task 1.3
In Task 1.3, we altered the setup in Task 1.2 to include the SSD1306 oled module so that we could display the temperature read from the DS18B20 temperature sensor, as shown in Figure 3.

Figure 3: Using the
nano,DS18B20 temperature
sensor,
and SSD1306 oled module to display temperature.
Task 2
In Task 2, we used an ISR
while displaying the temperature on the SSD1306 oled
module. We used several
different communication techniques like UART, I2C,
and OneWire. In
Demonstration 3, the LED
will blink every 4 seconds while still displaying
the temperature on the SSD1306.
Demonstration 3: LED will blink every 4 seconds while still displaying the temperature on the SSD1306.
Task 3.1
In Task 3.1, we were introduced to the ESP8266
WiFi module. The module allows for
microcontrollers to connect to a WiFi network
and make simple TCP/IP connections. In this
task, we used
the master, SSD1306
module and DS18B20 sensor to display the
temperature on the SSD1306 module, as shown in
Demonstration 4.
Demonstration 4: Demonstrating of using only text from ssd1306_128x64_i2c example.
Task 3.2
In Task 3.2, we built an
IoT based temperature sensor. We were able to do
this by having a master and a slave. The master
ran the script that was used in Task 3.1, where it
used the
SSD1306
module and DS18B20 sensor to display the
temperature on the SSD1306 module, while the
slave ran the script to manage the WiFi
connection to ThingSpeak, as shown in
Demonstration 5.
Demonstration 5:
Demonstrating of using only text from ssd1306_128x64_i2c
example.
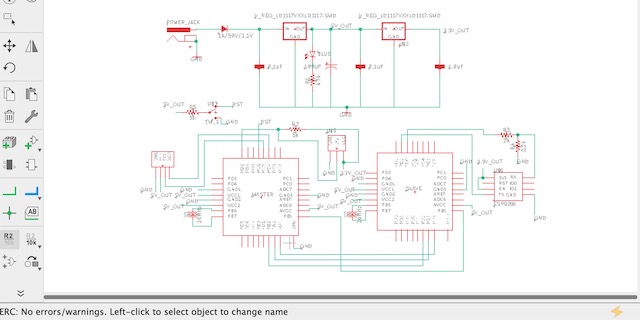
Task 5
In
Task 5, we were given the
task to design the
schematic and the PCB
layout of the system in
EAGLE. I had to create
parts for the ATMega328
surface mount, the DS1820,
the ESP
module,
and the SSD1306 module
which I was able to put
into a schematic as shown
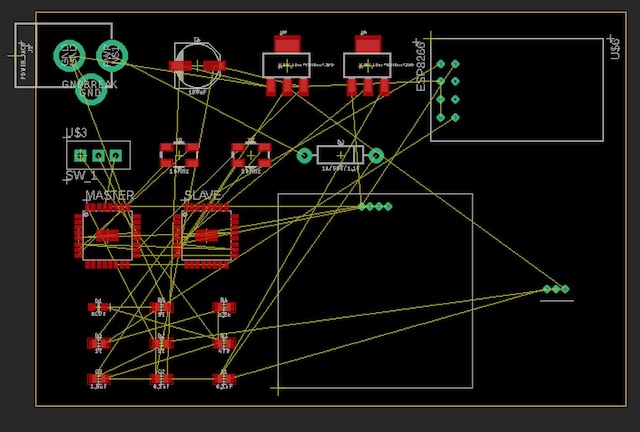
in Figure 4. Then I was
able to convert the
schematic to the BRD view
as shown in Figure 5, and
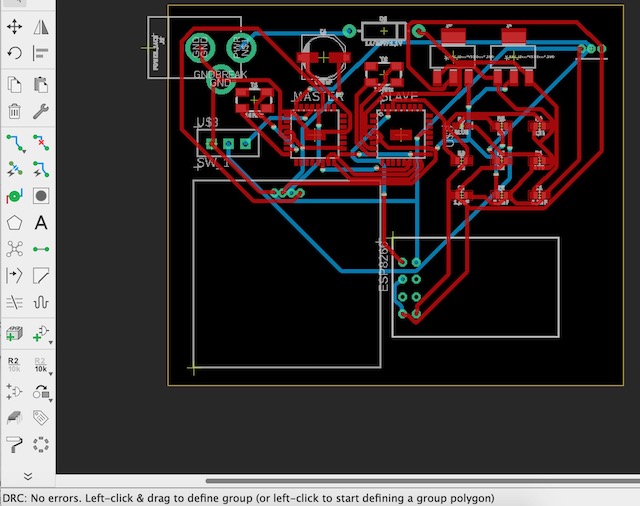
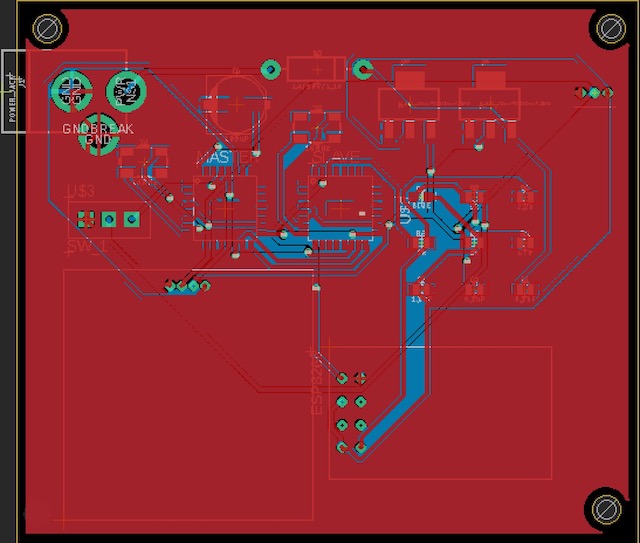
finally
was able to route the wires and pour the copper on the PCB as shown in Figures 6 and 7.
Discussion:
By completing these tasks
it gave me a better understanding of the ESP8266
module, DS18B20
temperature sensor, and the SSD1306 oled module. I was also to
understand ISR a little better, and now see the use for it. I
tried to attempt to implement push buttons to change the WiFi AP
username and password but it did not turn out as expected. I was
able to complete the PCB, but unfortunately I ran out of time to
produce a PCB that implements the pushbutton system to change
the WiFi AP username and password, but I might come back to it
later to see if I can get it working.