ENGR338 Lab 2021 Spring
Lab 2 Design an R-2R DAC
Tyrone Bracker
tabrackeryazzie@fortlewis.edu
Lab 2 Report: Working with EletricVLSI and LTSpice
1. Introduction
I have never worked with ElectricVLSI before this lab but I can see why
we'll be using it for this class. Learning new software always takes
some time to get used to and Electric was no different. Thanks to
"Tutorial 1: Introduction to ElectricVLSI" however, I managed to learn
the different settings required for our class and to have Electric
produce waveforms in LTSpice. I will admit it's been awhile since I've
worked in LTSpice, but as I progressed through the tutorial and even
during the first lab, some of the old knowledge started coming back,
albeit slowly.
2. Materials and Methods
Task 1 required some fimiliarty with ElectricVLSI so the first step was
to complete tutorial 1 at the beginning. It took some time to get used
to the controls of placing and wiring different objects in Electric but
eventually I got the hang of it. Once tutorial 1 was completed, the
rest of task 1 was fairly easy since all I had to do was copy a library
and simulate a pre-established schematic.
Task 2 is where I actually created a schematic and
icon for an "R-2R Ladder" DAC circuit. In the beginning I had forgotten
to export the pins on the "off page" ports which showed when my icon
didn't have any ports to connect to; this only slowed me down
momentarily after having another student review my work and point out
this mistake. After refining the icon, I successfully replaced the
10-bit ideal DAC from the previous task's schematic with the new
created one. No errors from F5-DRC scans and the LTSpice was created.
Task 3 was also easy to execute in terms of hand
calculations, Electric, and in LTSpice. For the hand calculations I had
to dig into previous classes in order to remember how to solve for the
time delay. Everything in electric and LTSpice was laid out and thus
simple to execute. Getting the percise position on the LTSpice graph
was a bit tough but I managed to get close enough to the values I got
in my hand calculated time delay.
3. Results
The actual work of Task 1 wasn't that hard since all I was doing was
simulating a pre-established design. The results of this can be seen
below in Figure 1. "ENGR333" is highlighted in Electric because it was one of the
requirements for having my own library to pull these designs from in
future tasks.
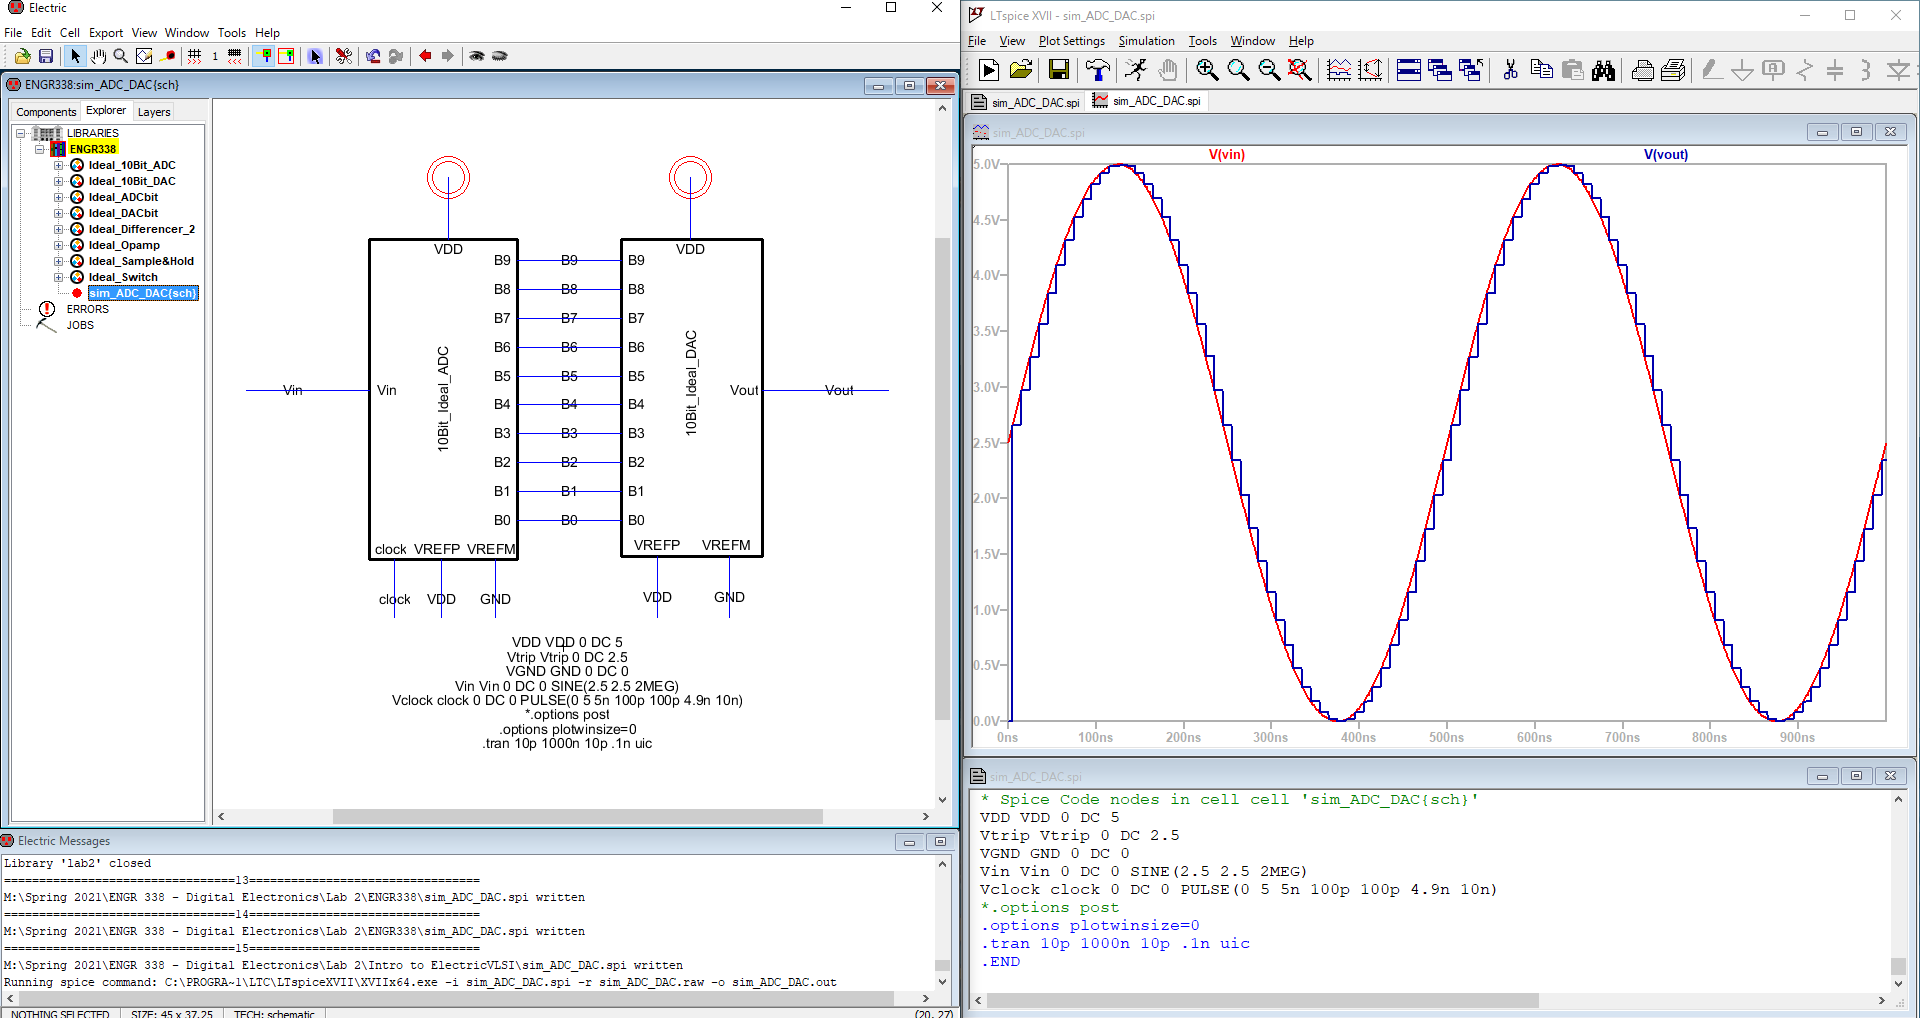
Figure 1. Results of Task 1
Below in Figure 2 are the results from my icon "2_2R_Ladder", combined with the
ideal ADC design from Task 2. Both resulted in an LTSpice plot similar to Task 1's
with the pre-made designs.
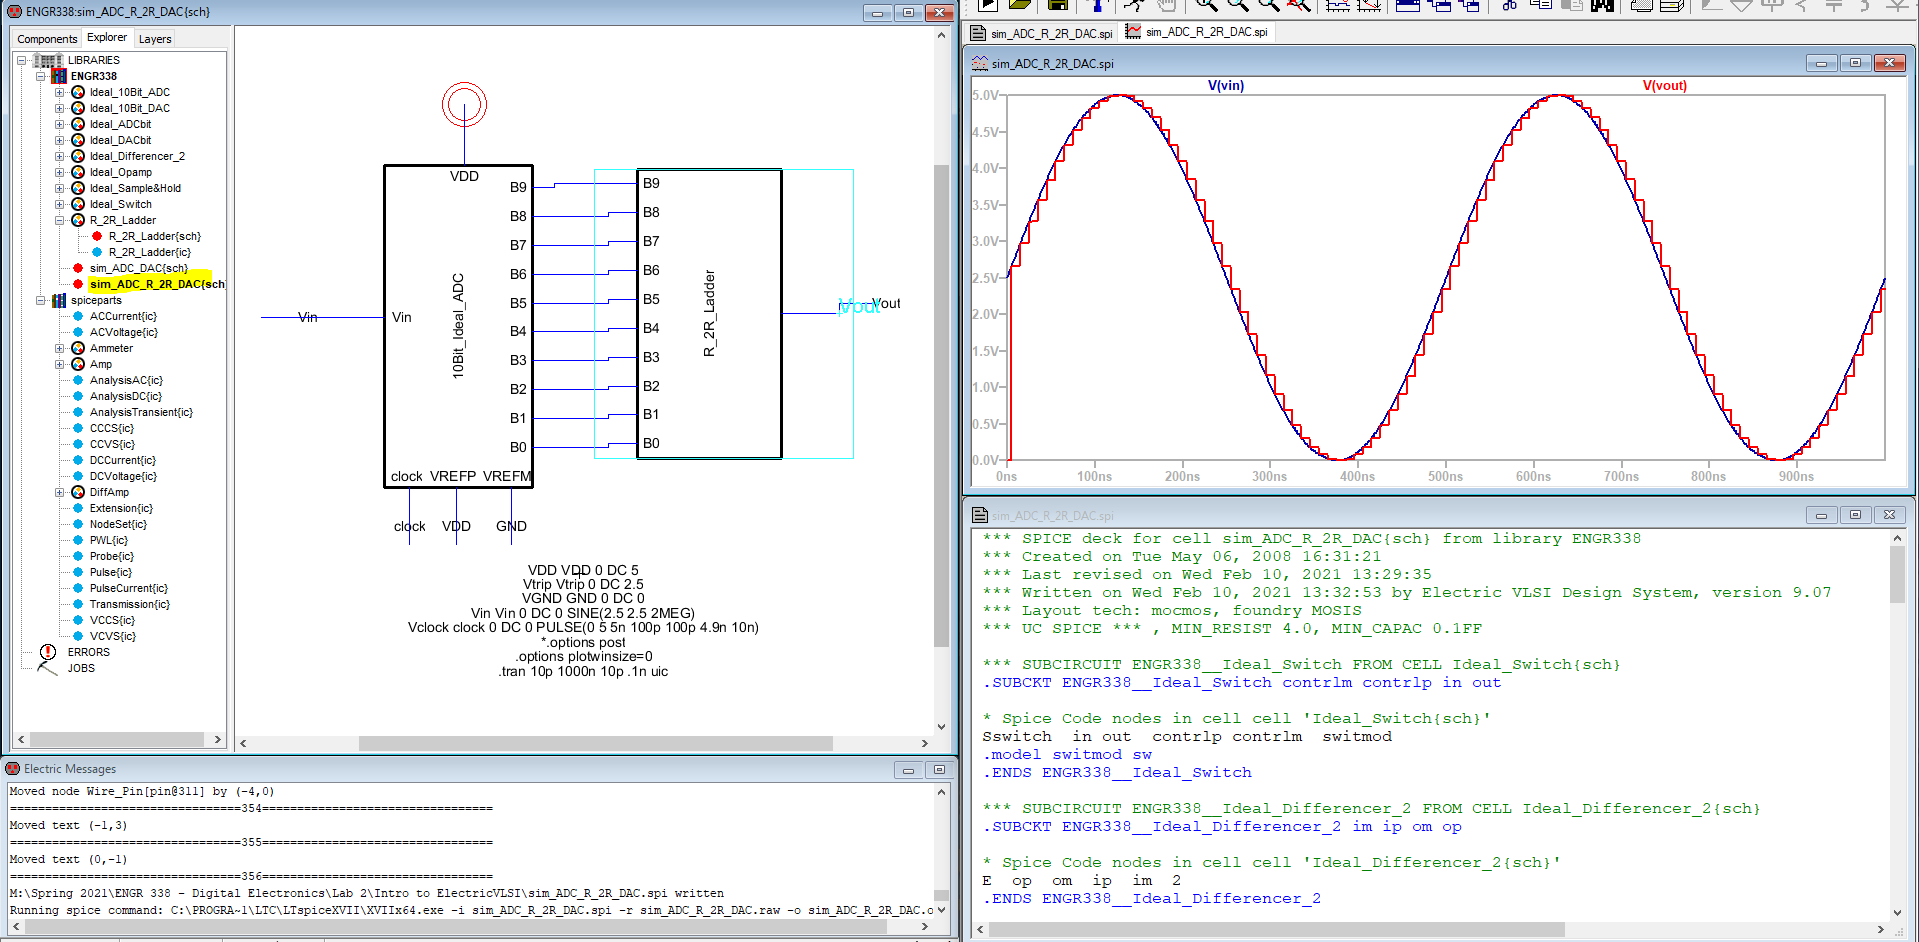 Figure 2. Results of Task 2
The figure with the two circuits solved with Thevenin's Equivelant in
the actual lab assignment was a great starting point for the hand
calculations! Below in Figure 3 is my version plus the answer I got
from it. 70 [nano-seconds] at 1.25V was my final answer and I managed to
recreate it in LTSpice with Electric.
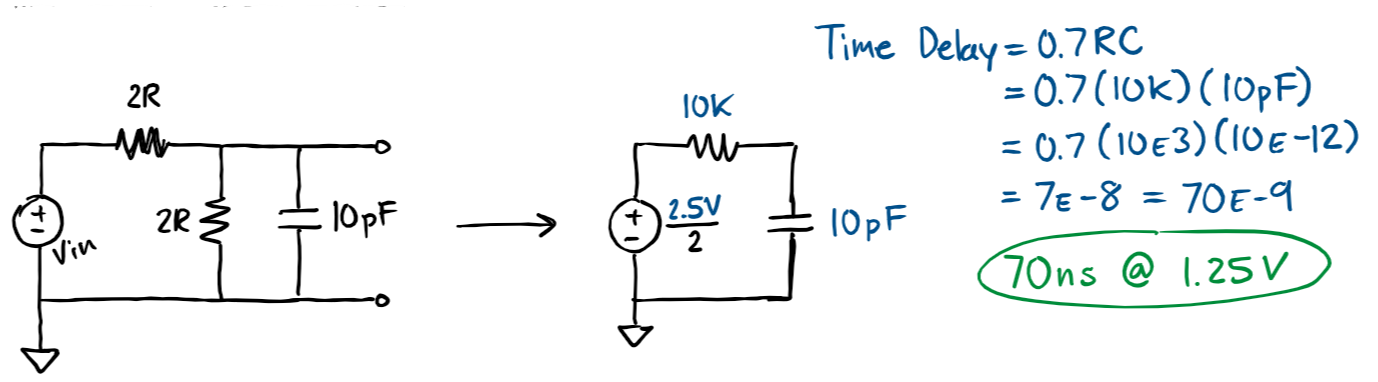
Figure 3. Hand Calculations of Task 3's Circuit
After the hand calculations were solved for, I matched these results in LTSpice which can be seen in Figure 4. The highlighted value is supposed to be positive 70 but my probes were
backwards. Still, with the probe around 1.25V, I managed to correctly
get the 70ns we were looking for.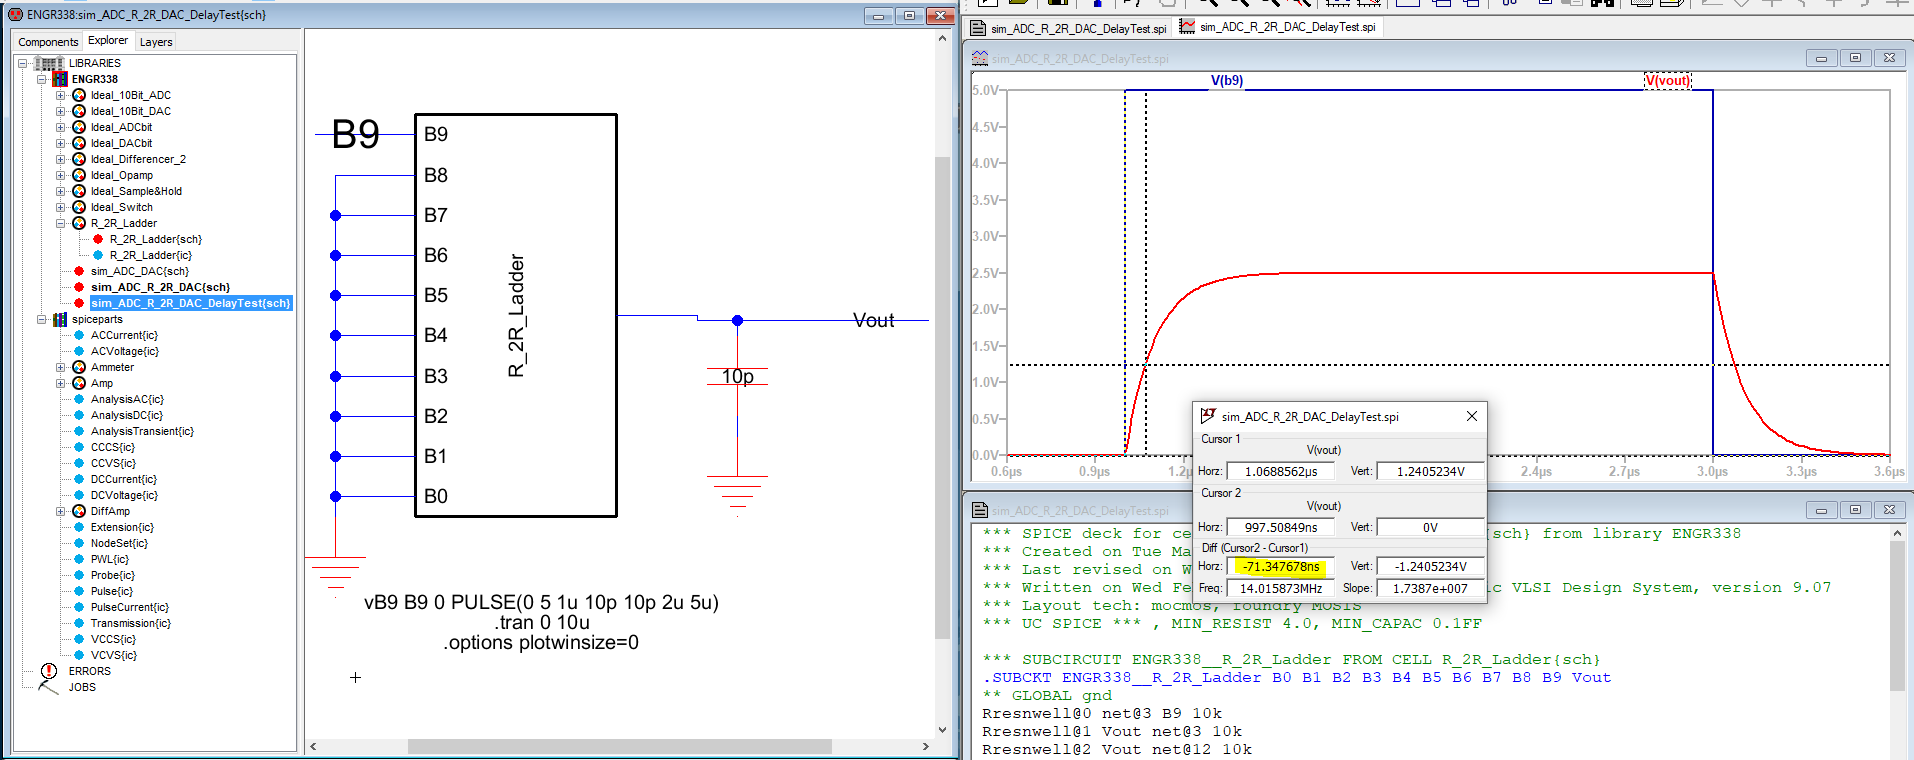
Figure 4. Results of Task 3
4. Discussion
"Tutorial 1: Intro. to ElectricVLSI" took me some time to get
the hang of but was informative and with time, I managed to complete
it.
After the tutorial, working in ElectricVLSI felt less daunting. I also
switched computers from working primarily on my laptop to working on a
school computer so I also had to reinforce my knowledge about
Electric's LTSpice settings since everything reset. For
the most part creating the various schematics wasn't too hard with only
some minor problems that were resolved with time or help from another
student.
Task 3 was the most problematic, because without the hand calculations
I wouldn't of understood the context of this task. It was only after I
solved for both the simulation and the calculations did things start
connecting to me. Overall I got more comfortable with the new
ELectricVLSI software and reinforced my old LTSpice knowledge but I
know there's still more I need to remember and learn. I look forward to
seeing what else ElectricVLSI and LTSpice can do together.