|
|
|
| Item |
Quantity |
|
|
|
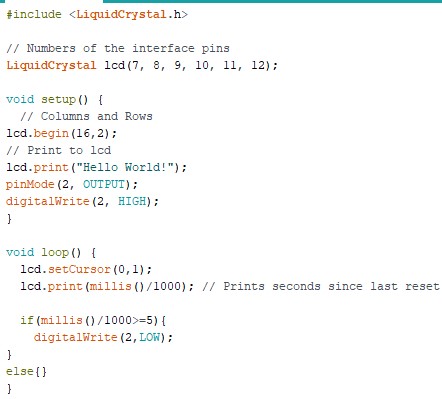
| Arduino IDE Arduino UNO Trim Potentiometer LCD 1602 |
1 1 1 1 1 |
|
|
|
|
|
|
|
|
|
|
|
|
 |
|
|
|
|
// Setup
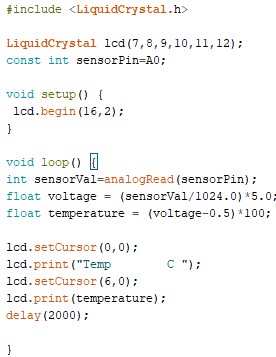
int latchPin=11;// RCLK int clockPin=9;// SRCLK int dataPin=12;//SER int D1=5; int D2=4; int D3=3; int D4=2; int ssddelay = 2; int dig1 = B0; int dig2 = B0; int dig3 = B0; int dig4 = B01110001; int tempPin = A0; byte SSDs=0x3F; // in binary, it is 0011 1111, which only turns off G and H, will display 0 void setup() { Serial.begin(9600); // Interrupts Stuff noInterrupts(); TCCR1A=0; //Reset Timer/Counter1 Control Register A TCCR1B=0; //Reset Timer/Counter1 Control Register B TCNT1=0; // Reset Timer/Counter1 OCR1A=6000; // Output Compare Register TCCR1B|=(1<<WGM12); TCCR1B|=(1<<CS12); TCCR1B|=(1<<CS10); TIMSK1|=(1<<OCIE1A); interrupts(); pinMode(latchPin,OUTPUT); pinMode(dataPin,OUTPUT); pinMode(clockPin,OUTPUT); // Setting The Digit Activation Pins pinMode(D1,OUTPUT); pinMode(D2,OUTPUT); pinMode(D3,OUTPUT); pinMode(D4,OUTPUT); } void loop() { // Assigns the binary output, SSDs, as a changing variable, dig1... SSDs = dig1; updateShiftRegister(); digitalWrite(D1,LOW); delay(ssddelay); digitalWrite(D1,HIGH); delay(ssddelay); // Assigns the binary output, SSDs, as a changing variable, dig2... SSDs = dig2; updateShiftRegister(); digitalWrite(D2,LOW); delay(ssddelay); digitalWrite(D2,HIGH); delay(ssddelay); SSDs = dig3; updateShiftRegister(); digitalWrite(D3,LOW); delay(ssddelay); digitalWrite(D3,HIGH); delay(ssddelay); // Assigns the binary output, SSDs, so that only the point is shown... SSDs = B10000000; updateShiftRegister(); digitalWrite(D2,LOW); delay(ssddelay); digitalWrite(D2,HIGH); delay(ssddelay); // Assigns the binary output, SSDs, as "F"... SSDs = dig4; updateShiftRegister(); digitalWrite(D4,LOW); delay(ssddelay); digitalWrite(D4,HIGH); delay(ssddelay); } // Function that handles the shift register... void updateShiftRegister() { digitalWrite(latchPin,LOW); // Stops the code code from being passed... shiftOut(dataPin,clockPin,MSBFIRST,SSDs); // Sends data while stepping clock... digitalWrite(latchPin,HIGH); // Sends all of the data to outputs... } // Simple function that assigns the previously mentioned "changing variable"... void lookup(int num, int n){ if(num == 0){ num = B00111111; } else if(num == 1){ num = B00000110; } else if(num == 2){ num = B01011011; } else if(num == 3){ num = B01001111; } else if(num == 4){ num = B01100110; } else if(num == 5){ num = B01101101; } else if(num == 6){ num = B01111101; } else if(num == 7){ num = B00000111; } else if(num == 8){ num = B01111111; } else if(num == 9){ num = B01111111; } // Serial.println(num); // Serial.println(n); // Determines which variable to assign the binary too. if(n == 1){ dig1 = num; Serial.print("dig1: "); Serial.println(dig1); } else if(n == 2){ dig2 = num; Serial.print("dig2: "); Serial.println(dig2); } else if(n == 3){ dig3 = num; Serial.print("dig3: "); Serial.println(dig3); } } // The actual interupt... ISR(TIMER1_COMPA_vect){ // Temp Collections and Calculations int sensorVal=analogRead(tempPin); float voltage = (sensorVal/1024.0)*5.0; float tempF = ((voltage-0.5)*100*9/5)+32; // Serial.println(tempF); // Multiplies the temp by 10 to shift all relevant decimals. // Then converts to integer... int tempint = (int)(tempF*10); // Serial.println(tempint); int num1 = tempint/100; // Assignes first digit int num2 = tempint/10 - num1*10; // Assignes second digit int num3 = tempint - num1*100-num2*10; // Assignes third digit // Runs the assignment function... lookup(num1, 1); lookup(num2, 2); lookup(num3, 3); } |
|