CE 432 Lab 2021 Fall
Lab 6
Name: Nicolas Llarena Email:
Njllarenaarias@fortlewis.edu
1. Homework 6 -
Sensors and Actuators
2. Introduction
The purpose of this homework is to practice and get familiar with
different coding and wiring problems that will be useful for th course
project. Videos and images will be taken of all tasks to demonstrate
how they are working. 3. Materials
Materials
Quantity
Arduino UNO
2
Breadboard
1
Jumper Wires
20
Open-Smart 2.4 GHz Transceiver
2
Joystick
1
A4988 Driver
1
NEMA 17 stepper motor
1
HC-SR04
1
Function Generator
1
Oscilloscope
1
MPU-6050
1
4. Results
Task 1
The full-bridge
configuration is the best to use because it is linear while the others
are not. Having more strain gauges makes it more sensitive as well
which is also a plus. Quarter-bridges and half-bridges usually have
imbalances in their output and are not as accurate as full-bridges.
In the image below, we can see the different equations of the
voltage output of each wheatstone bridge. as we can see when applying a
force, all the resistances of the four strain gauges change by the
amount delta R. This makes the full-bridge more sensitive and more
accurate than the rest.
Figure
1. Equations for the Wheatstone Bridges
Task
2
Video 1. HC-SR04 ultrasonic module connected with an
Arduino to display the distance in cm between the module and an object.
Task 3
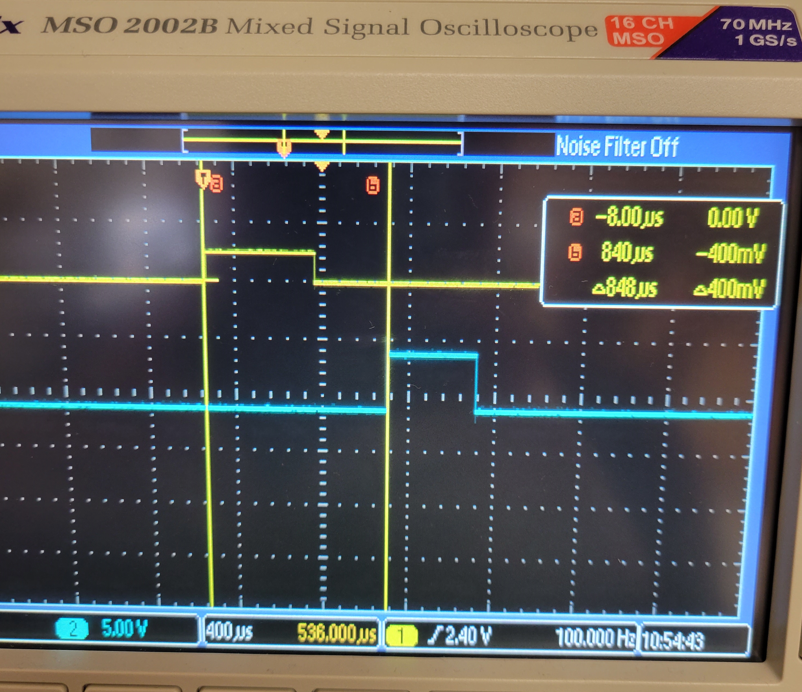
Figure 1. Image shows an input pulse
signal generated with a function generator and fed through an Arduino that
delays the output pulse signal by ~ 800us.
Task
4
Video 2. Video shows the MPU6050 module connected with an
Arduino UNO to detect vibrations and turn an LED on whenever a certain
threshold has been passed.(used LED instead of buzzer because I didn't have one, it is the same concept)
Task 5
Video 3. Two Arduino UNOs
connected with two Open-Smart 2.4Ghz modules that work as receiver and
transmitter, a NEMA stepper motor, and a joystick to control the speed
and direction of the stepper motor.
Task 6
Video 4. Algorithm two from the slides implemented
on an Arduino to demonstrate the encoder.
Discussion This homework was longer than usual
but it was helpful because we learned or remembered how to use certain
modules with Arduino. the pulse detector was a little challenging since
we had to be in the lab to use the oscilloscope and function generator
to be able to test our code. For task 3 I forgot to take a video for
the demonstration so I only have images to show how I connected
everything and the final result plus the code is in the server. Looking
forward to implementing some of these ideas into our course project.