CE432 Robotics II Lab 3: Sensors and Actuators Assignment
Name: Audra Benally Email: albenally1@fortlewis.edu
1. Title: Homework #6 Sensors and Actuators
2. Introduction: In this lab there were several tasks set forth
that we were to accomplish by the due date. These tasks focused on
sensors and actuators which were described and talked in length in the
recent lectures.
3. Materials and Methods:
Materials: - Elegoo UNO R3
- Computer
- Various connector wires
- HC-SR04
- Tutorial References
- MPU6050
- Buzzer
- Joystick
- NEMA stepper motor
- Open-Smart transceiver modules
Methods:
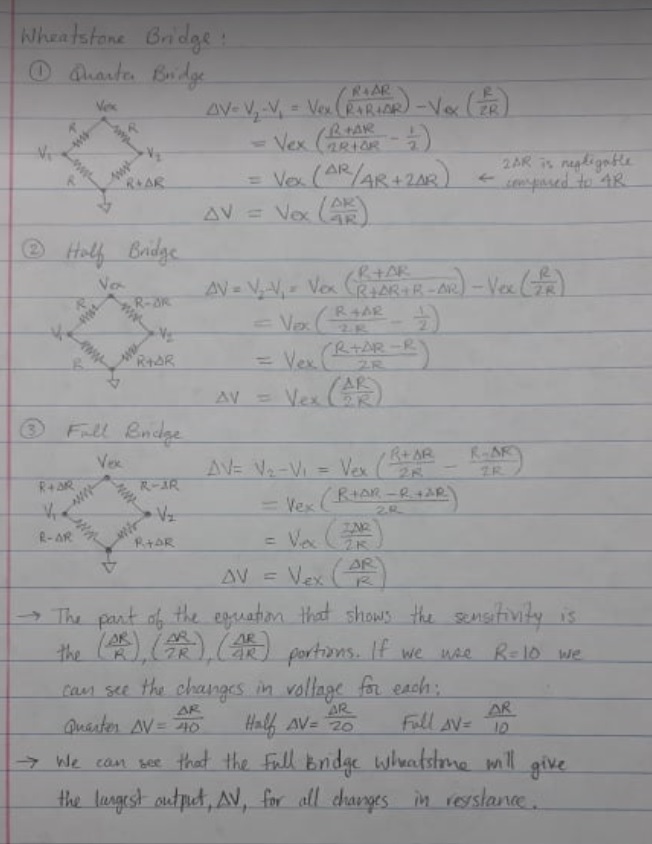
For task 1 the lecture for the
Strain Gauge was referenced to show how the calculations for the
Wheatstone Bridges. The equations were compared to show that the full
bridge is the most sensitive to resistance changes. For task 2 the
HC-SR04 was used to measure distance. The figures under task 2 show the
results and the code can be found in the HW6_code.txt file. For task 3
we were supposed to design a pulse detector but I was unable to get my
arduino to work the way it was supposed to. For task 4 we used the
MPU6050 to detect vibration and cause the buzzer to activate when a
certain threshold is met. The results can be seen in the video under
task 4. For task 5 the joystick was used with the open-smart
transceivers to control the speed and direction of a stepper motor. I
used two different speeds for two separate directions. The results can
be seen below. For the last task, Algorithm II was used to show the
direction the rotary encoder was turning. When A experiences a rising
edge while B is high then the encoder is turning counter clockwise and
if B is low during A's rising edge then the encoder is turning
clockwise. See video 3 for the results.
4. Results:
Task 1: Wheatstone Bridge Calculations
Figure 1.
Calculation process to show that the full wheatstone bridge is the most
sensitive to resistance variations.
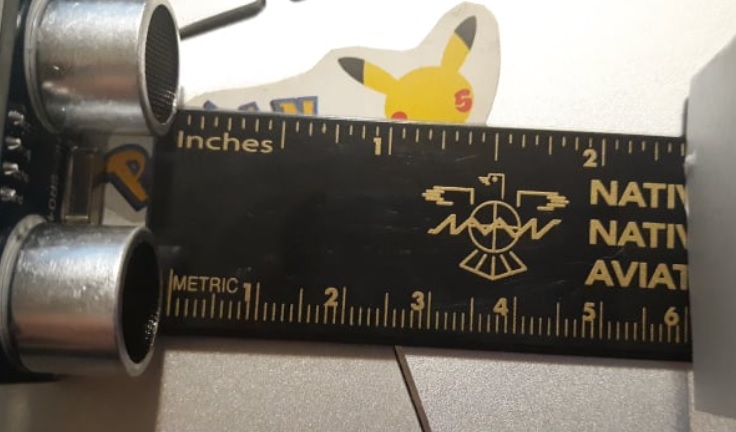
Task 2: Measuring distance using the HC-SR04
Figures 2, 3,
4. The actual distances that will be measured by the HC-SR04 module.
These distances are 6cm, 10cm, and 13.5cm.
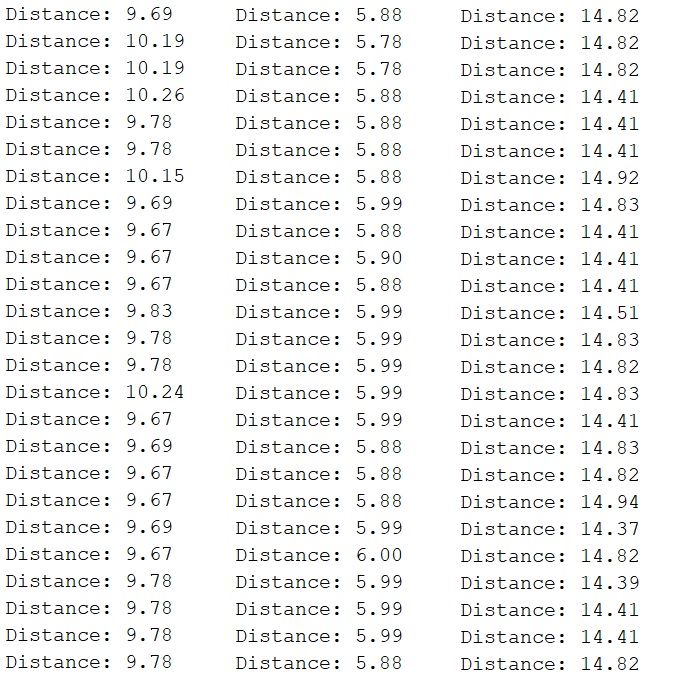
Figure 5. The
distance measured by the HC-SR04 and output to the serial monitor.
Task 3: Pulse detector using an UNO board.
Unsuccessful, see HW6_code to see attempt.
Task 4: Vibration detector using MPU6050 and buzzer.
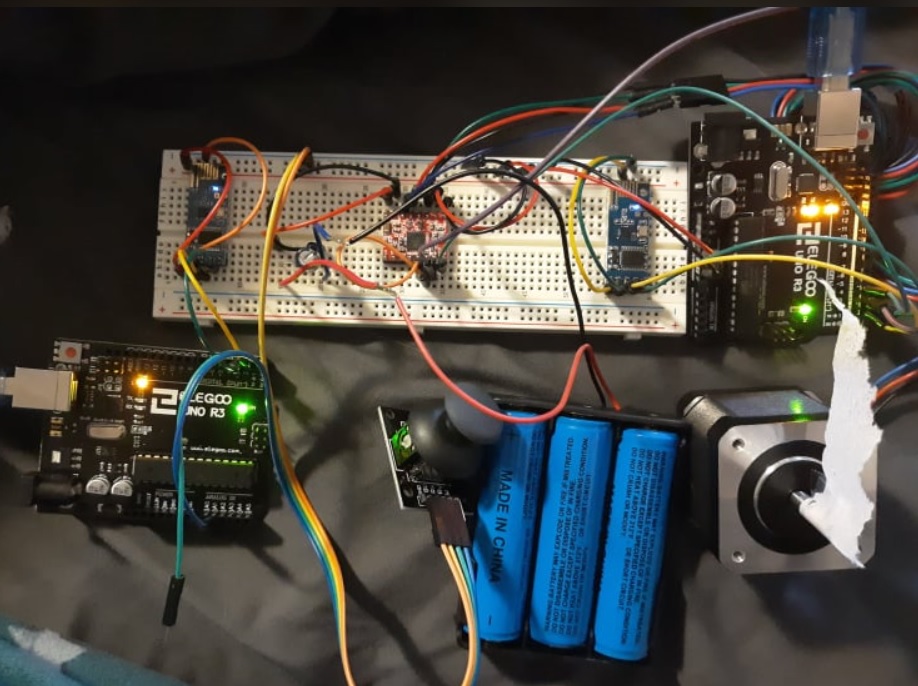
Video 1. Vibration detector. Task 5. Controlling the Stepper Motor with the Joystick and Open-Smart Transceiver Modules
Figure 6. Circuit connections for the task.
Video 2. Joystick wirelessly controlling the stepper motor.
Task 6: Implement Algorithm II to indicate the rotational direction of the Rotary Encoder.
Video 3. Serial output of the rotational direction of the rotary encoder.
5. Discussion
For this lab the tasks were quite fun and interesting to finish. For
the first task everything went smoothly and the equations were easy to
understand. For task 2 the HC-SR04 was proving to be accurate until I
tried to measure 13.5cm away. I had a lot of trouble for task 3 and got
very lost after adding a bunch of unneeded variables. This was the last
task I was tackling because I knew I was going to have a ton of trouble
and I didn't have enough time to get it done before I wanted to turn in
this report. For task 4 I really enjoyed retyping my code to make the
detection reliable. I started by using static numbers and then realized
that using differences between the present and last states was better
and much more reliable. For task 5 I had a little trouble with the
speed control of the "up" command. During my testing (joystick
connected directly to stepper motor) I didn't have any issues with the
speed. Once I connected the transceivers there was an odd stuttering
that happened with the faster speeds. At the "down" command there is a
stutter for a moment before it speeds up. The stutter does not go away
with the "up" command though. There is a link in the description of the
Joystick video (video 2) that shows the testing phase results. I did
not have enough time to dive into this issue. For the last task it was
interesting trying to detect a rising edge for the A output. Once this
was figured out the code worked quite well. This lab was very
informative and I enjoyed searching for all the answers I needed to
figure out each task.