CE432 Robotics II Final Project: Self Balancing Car
Name: Audra Benally Email: albenally1@fortlewis.edu
1. Title: Self Balancing Car Project
2. Introduction: For this project we followed a tutorial to build a
two-wheeled self balancing car. For this endeavor we practiced coding a closed-loop PID feedback system, using Elegoo UNO R3's interrupts,
and controlling the master/slave controls for the accelerometer. The
hardware used included the MPU6050 accelerometer, two NEMA stepper
motors paired with two A4988 stepper motor drivers, the open-smart
transceivers, an analog thumb joystick, and the ATMEGA328P
microcontroller. After successful wiring we also designed a PCB for the
controlling circuitry and the joystick controller. For these tasks, we
also used the 3D printers and other machinery to assemble our final
product design.
3. Materials and Methods:
Materials: - Elegoo UNO R3
- Computer
- Various connector wires
- Tutorial References
- MPU6050
- A4988 stepper motor drivers
- Joystick
- NEMA stepper motor
- Open-Smart transceiver modules
Methods:
For this lab there were several
tasks to complete before getting the device to balance. First, in part
1, we displayed specific data that was taken from the MPU6050 device
for each task. Task 5 called for raw acceleration data from the X axis.
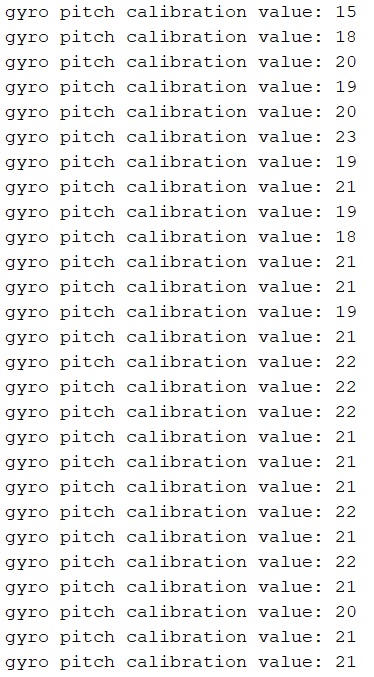
Task 6 had us display the averaged gyro pitch calibration value in the
serial monitor. Task 7 introduced the timing method that will be used
for the timing value for the gyroscope calculations as we were
challenged to blink a LED at 1Hz using the method. Tasks 8 and 9 called
for the angle calculations using the MPU6050. Task 8 methods used
gyroscope and accelerometer data combined in a complementary filter to
give the angle in which the balancing car has rotated. Task 9, which
was labeled as a repeat of task 8, also showed the rotation angle but
using only the accelerometer data. The next part of the project was the
actual balancing of the robot. The next tasks were to make the car
balance on a flat surface, then to add some type of weight as well as
push the car forward and backward and have the car remain balanced. For
extra credit a joystick can be added to the system and the car can be
challenged to pass over a ramp and remain balanced. The final tasks
were designed as partner work. Two PCBs were designed by each person, a
car PCB and a joystick remote PCB. The last task was for the final
testing, the presentation, and the report writing.
4. Results:
Part 1: Task 5: Modify the MPU's code to display the raw acceleration data of the X axis.
Part 1: Task 6: Use the code to report
the averaged 'gyro_pitch_calibration_value' to the serial monitor.
Part 1: Task 7: Use the loop_timer technique to blink an LED at 1Hz.
Video Link: https://youtu.be/J2AzntNGqdk
Embedded Video:
Part 1: Task 8: Mount the MPU6050
sensor/breadboard on the top of the car. Gently lean the car from 0
degrees to 90 degrees and -90 degrees.
Video link: https://youtu.be/jM7T6h6P6Mk
Embedde video:
Part 2: Task 8 Repeat: Use only the
accelerometer's data to calculate the angles and repeat Task 8 using
the new sketch.
Video link: https://youtu.be/jM7T6h6P6Mk
Embedded video:
Part 2: Task 1: Complete the simplified version of the
project shown in the video demonstration above.
I tried recording this a couple times and these were
my best attempts. The videos are a little long so I'll just provide the
links.
Video 1 link: https://youtu.be/t6VZp57hRMs
Video 2 link: https://youtu.be/Nlh7UP9Vi2g
Video 3 link: https://youtu.be/98uSden207E
5. Discussion
For this lab the tasks were very helpful in understanding the
components of the self-balancing car. I had trouble getting through
task 8 and I later found that this may be my issue in getting the
balancing car to work. The range of the angle for the gyroscope is
supposed to be -90 to +90 but as you can see in the video for task 8 my
angle was outputting -13 to +14.5. I do not know what is causing
my angle data to be incorrect and I went through all the calculations a
few times and still cannot find the issue with my calculations.
For the balancing car I had a lot of trouble for a
long time. It took a few tries to get the car to attempt to balance,
and even then it only balanced for about a second. The accelerometer
calibration value changed often while I was trying to find the actual
value so I put a piece of code to calibrate the accelerometer every
time, just like the gyroscope. I had switched the stepper motor step
size a couple times with no positive results before realizing the issue
with my angle data. I finally realized the angle data issue after restarting to retrace my steps. I tried once again to find the
calculation error but eventually gave up after spending too much time on
it. So, for testing I inserted a correction factor to try to get the
car to work. I found this value by taking expected range/actual range =
90/13 ~ 7. After this correction I was able to change the stepper
motor to a quarter step and finally got the car to balance for about 4
seconds before it fell over.
For the PCB portions, I agreed to put together
the
joystick while my partner put together the car PCB. I had incorrectly
thought there were female-to-female header connectors available when I
implemented an idea for the joystick PCB. I later found that they were
wire housings and much too large to reliably fit and connect two wire
connections. I overcame this issue by soldering loose blue wires to the
PCB and sticking the blue wires into the wire housings. I added extra
solder to the end of the wire so that the joystick pins would
dependably
connect to the blue wiring. I checked the connections often and found
that the joystick connections were stable. I then started programming
the joystick controller to connect to my car but found that the
controller was having trouble transmitting the joystick information.
While troubleshooting I verified the VCC and GND connections for all of
my components and found no issues. Using the multimeter I also found
that the joystick pins were also responding appropriately. I switched
to transmitting a set value and then the transmitter began blinking. I
found that the receiving code never went into the
"while(BlueSerial.available())" loop.