Lecture
36 GUI - PyQt III
Layout
management is the way how we place the widgets on the application
window. We can place our widgets using absolute positioning or with
layout classes. Managing the layout with layout managers is the
preferred way of organizing our widgets.
1. Absolute positioning
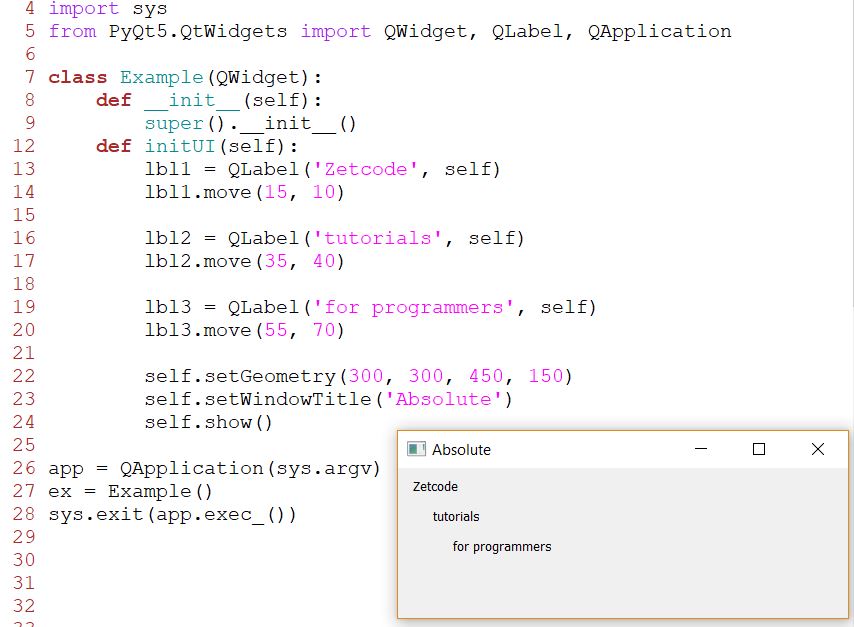
We
use the move() method to position our widgets. In our case these are
labels. We position them by providing the x and y coordinates. The
beginning of the coordinate system is at the left top corner. The x
values grow from left to right. The y values grow from top to bottom.
The label widget is positioned at x=15 and y=10.
2. Box layout
QHBoxLayout
and QVBoxLayout are basic layout classes that line up widgets
horizontally and vertically. Imagine that we wanted to place two
buttons in the right bottom corner. To create such a layout, we use one
horizontal and one vertical box. To create the necessary space, we add
a stretch factor.
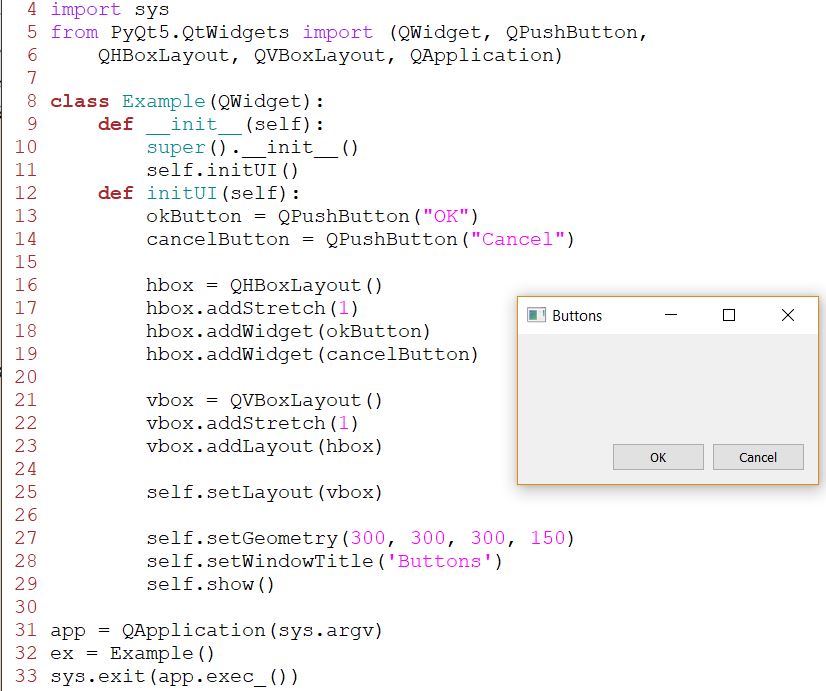
The
example places two buttons in the bottom-right corner of the window.
They stay there when we resize the application window. We use both a
HBoxLayout and a QVBoxLayout.
Here we create two push buttons.
We
create a horizontal box layout and add a stretch factor for both
buttons. The stretch adds a stretchable space before the two buttons.
This will push them to the right of the window.
The
addStretch method adds a QSpacerItem to the end of a box layout. A
QSpacerItem is an adjustable blank space. Using vbox.addStretch(1) will
add a zero-width spacer-item that expands vertically from the top of
the layout downwards. Using hbox.addStretch(1) will add a zero-height
spacer-item that expands horizontally from the left of the layout
rightwards. The value '1' means the first QSpacerItem. If you put '2' there it is considered as the second QSpacerItem.
Finally, we set the main layout of the window.
3. Grid layout
QGridLayout is the most universal layout class. It divides the space
into rows and columns.
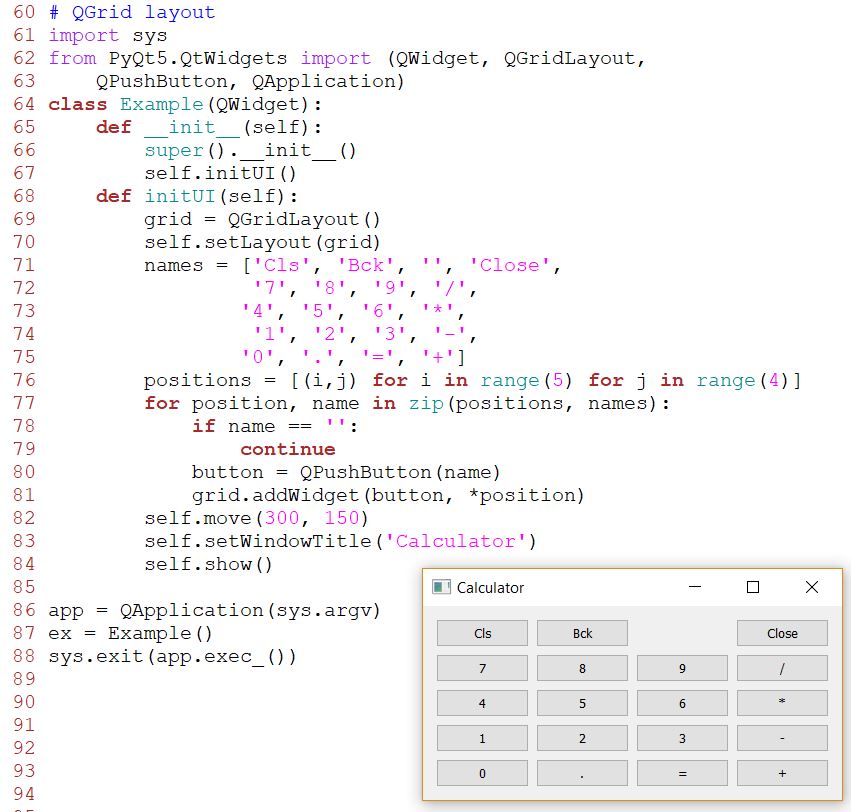
In
our example, we create a grid of buttons. The instance of a QGridLayout
is created and set to be the layout for the application window. These
are the labels used later for buttons. We create a list of positions in
the grid. Buttons are created and added to the layout with the
addWidget() method.
4. Review example
Widgets can span multiple columns or rows in a grid. In the next
example we illustrate this.
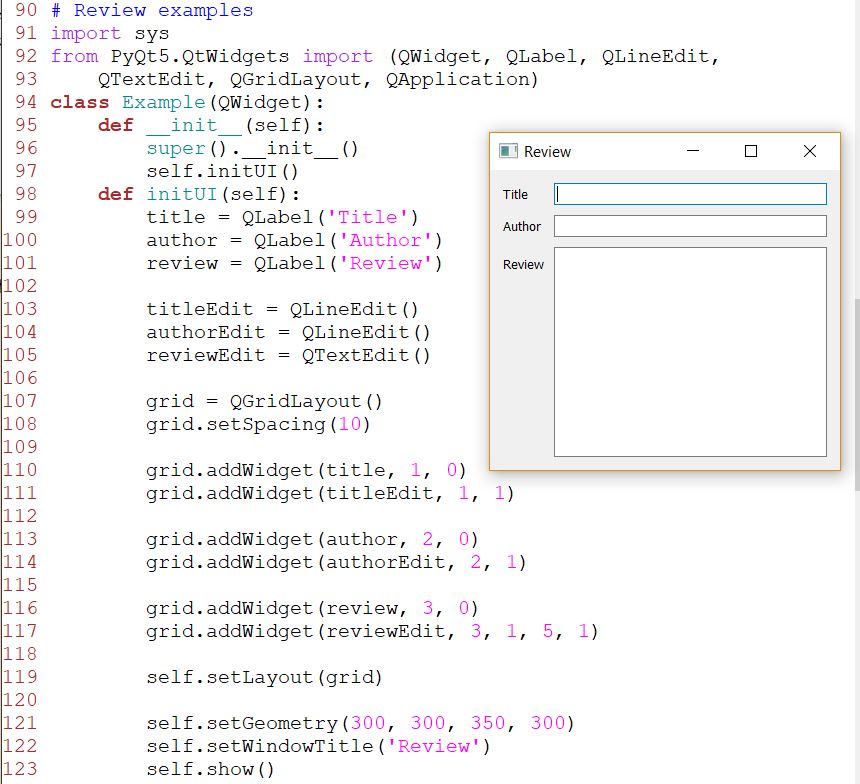
We
create a window in which we have three labels, two line edits and one
text edit widget. The layout is done with the QGridLayout. We create a
grid layout and set spacing between widgets.
If we add a widget to a grid, we can provide row span and column span
of the widget. In our case, we make the reviewEdit widget span 5 rows.
5. Events and signals
GUI
applications are event-driven. Events are generated mainly by the user
of an application. But they can be generated by other means as well;
e.g. an Internet connection, a window manager, or a timer. When we call
the application's exec_() method, the application enters the main loop.
The main loop fetches events and sends them to the objects. In the
event model, there are three participants:
*event source
*event object
*event target
The
event source is the object whose state changes. It generates events.
The event object (event) encapsulates the state changes in the event
source. The event target is the object that wants to be notified. Event
source object delegates the task of handling an event to the event
target. PyQt5 has a unique signal and slot mechanism to deal with
events. Signals and slots are used for communication between objects. A
signal is emitted when a particular event occurs. A slot can be any
Python callable. A slot is called when its connected signal is emitted.
This is a simple example demonstrating signals and slots in PyQt5.
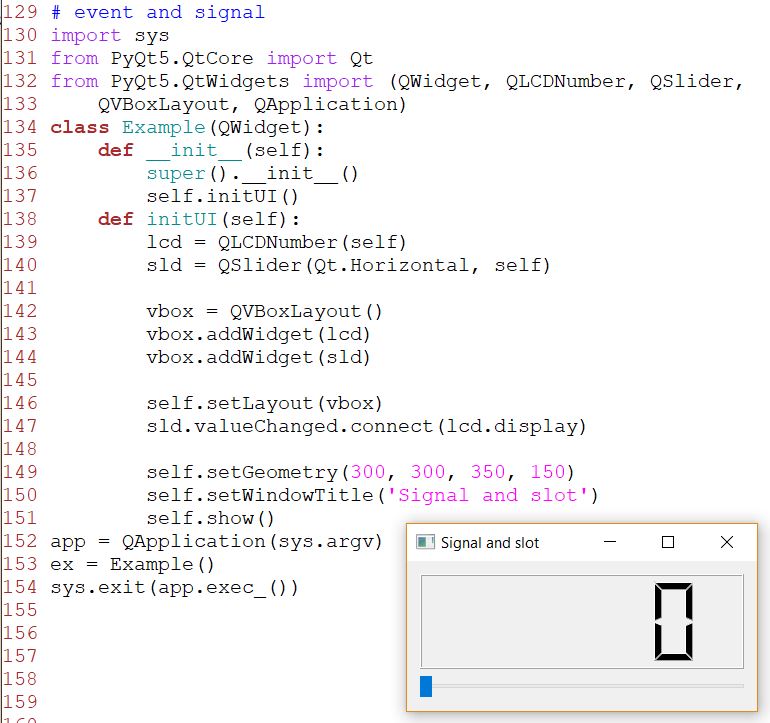
In our example, we display a QtGui.QLCDNumber and a QtGui.QSlider. We
change the lcd number by dragging the slider knob. Here
we connect a valueChanged signal of the slider to the display slot of
the lcd number. The sender is an object that sends a signal. The
receiver is the object that receives the signal. The slot is the method
that reacts to the signal.
6. Reimplementing event
handler
Events in PyQt5 are processed often by reimplementing event handlers.
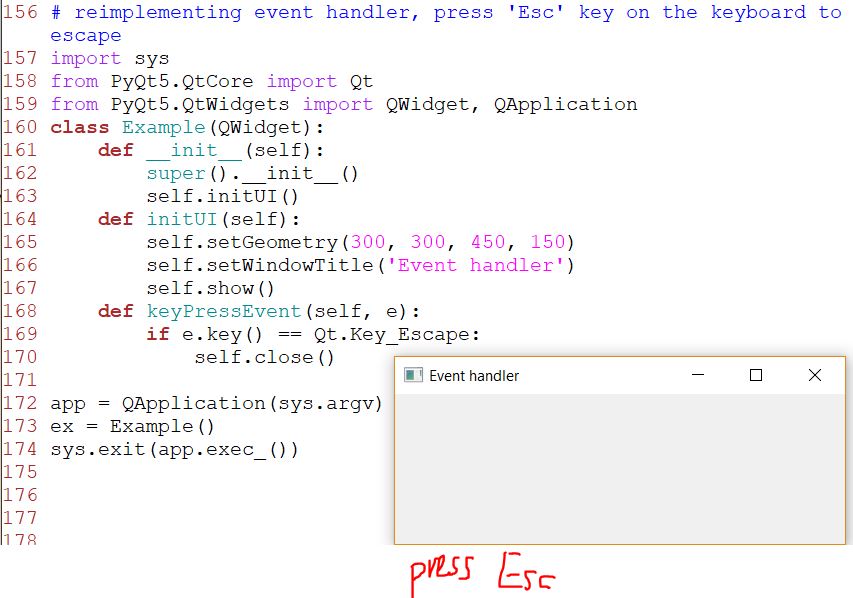
In our example, we reimplement the keyPressEvent() event handler. If we
click the Escape button, the application terminates.
7. Event object
Event
object is a Python object that contains a number of attributes
describing the event. Event object is specific to the generated event
type.
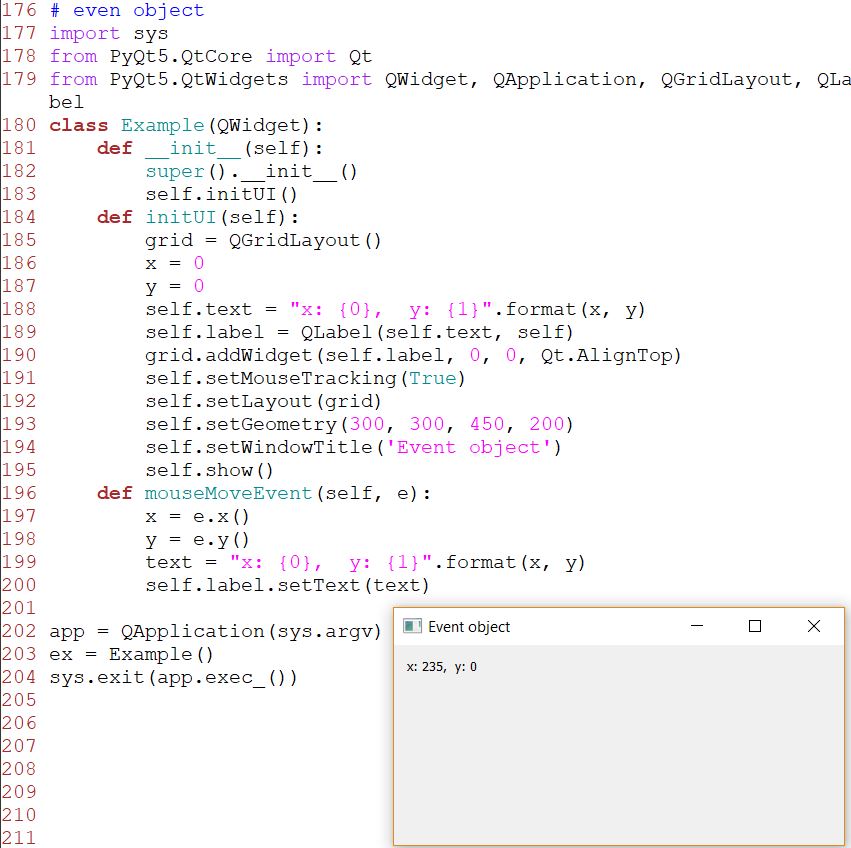
In
this example, we display the x and y coordinates of a mouse pointer in
a label widget. The x and y coordinates are displayd in a QLabel
widget. Mouse
tracking is disabled by default, so the widget only receives mouse move
events when at least one mouse button is pressed while the mouse is
being moved. If mouse tracking is enabled, the widget receives mouse
move events even if no buttons are pressed. The e is the event object;
it contains data about the event that was triggered; in our case, a
mouse move event. With the x() and y() methods we determine the x and y
coordinates of the mouse pointer. We build the string and set it to the
label widget.
8. Event sender
Sometimes it is convenient to know which widget is the sender of a
signal. For this, PyQt5 has the sender() method.
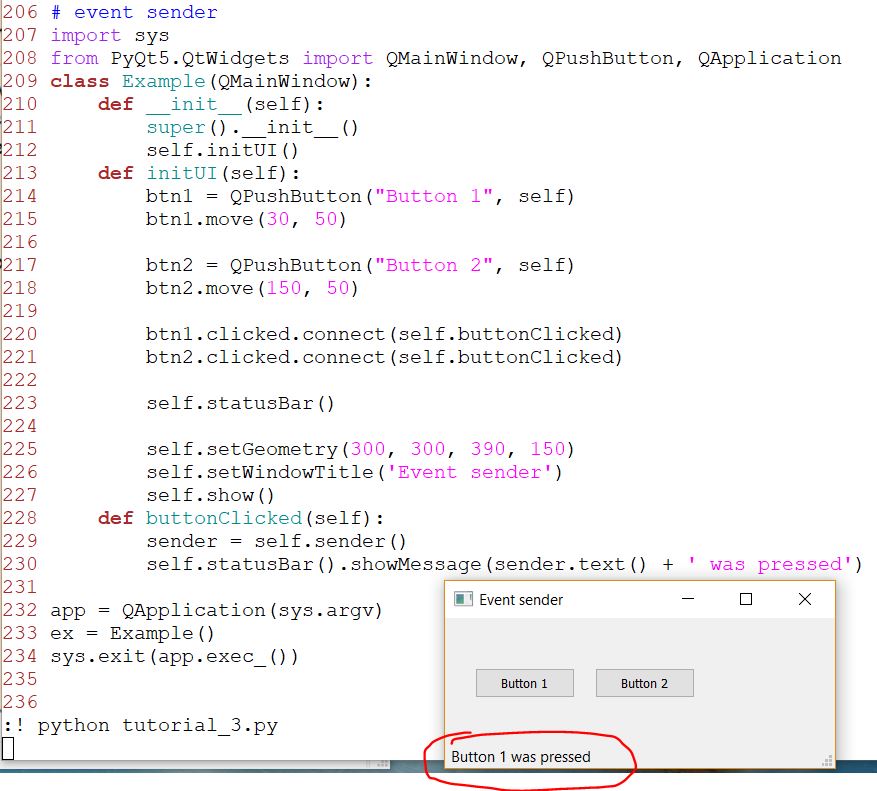
We
have two buttons in our example. In the buttonClicked() method we
determine which button we have clicked by calling the sender() method.
Both buttons are connected to the same slot. We determine the signal
source by calling the sender() method. In the statusbar of the
application, we show the label of the button being pressed.
9. Emitting signals
Objects created from a QObject can emit signals. The following example
shows how we to emit custom signals.
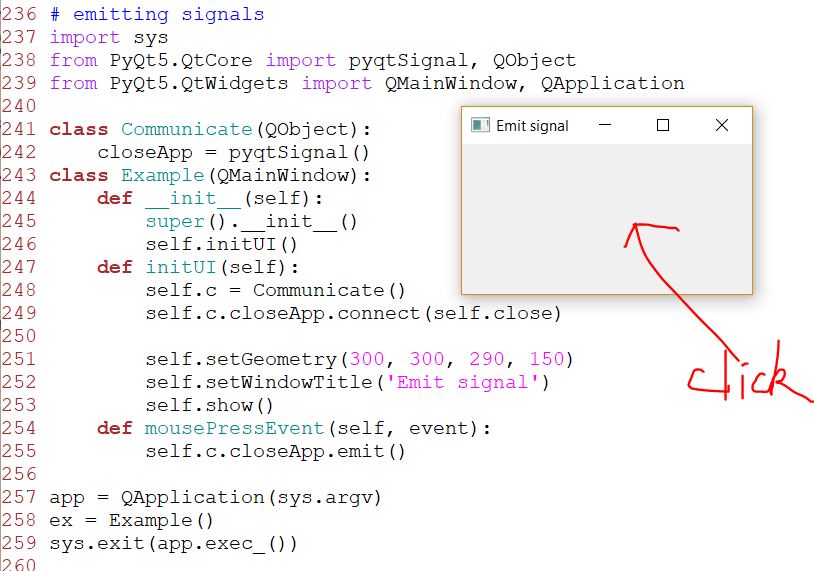
We
create a new signal called closeApp. This signal is emitted during a
mouse press event. The signal is connected to the close() slot of the
QMainWindow. A signal is created with the pyqtSignal() as a class
attribute of the external Communicate class. The custom closeApp signal
is connected to the close() slot of the QMainWindow. When we click on
the window with a mouse pointer, the closeApp signal is emitted. The
application terminates.
10. Dialogs
Dialog
windows or dialogs are an indispensable part of most modern GUI
applications. A dialog is defined as a conversation between two or more
persons. In a computer application a dialog is a window which is used
to "talk" to the application. A dialog is used to input data, modify
data, change the application settings etc.
QInputDialog
QInputDialog
provides a simple convenience dialog to get a single value from the
user. The input value can be a string, a number, or an item from a list.
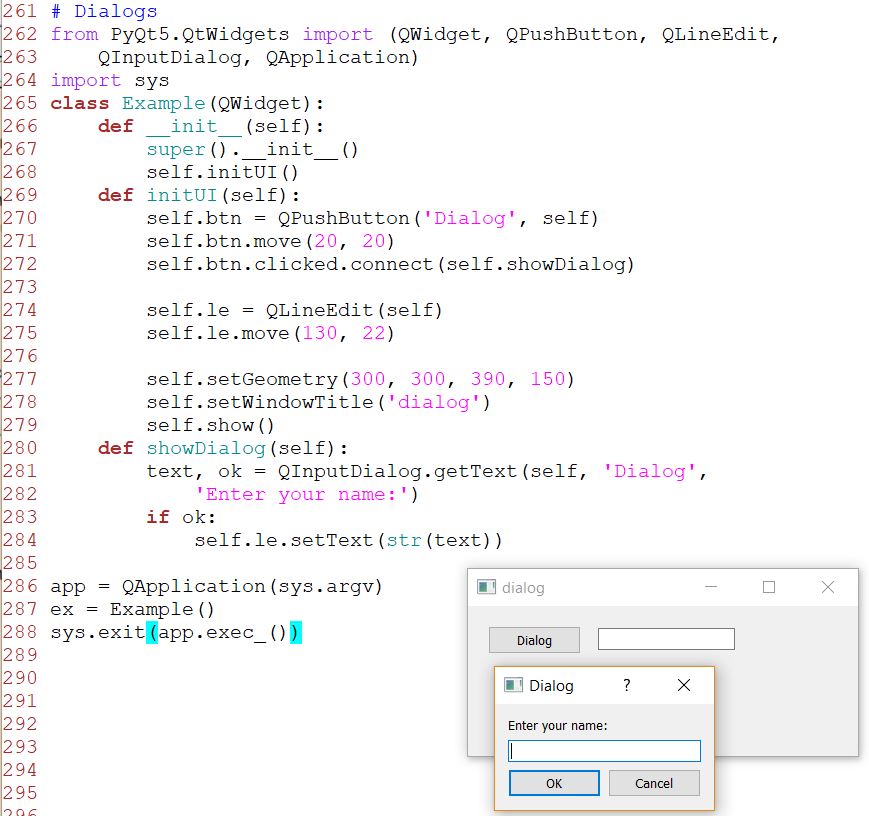
The example has a button and a line edit widget. The button shows
the input dialog for getting text values. The entered text will be
displayed in the line edit widget. This line displays the input dialog.
The first string is a dialog title, the second one is a message within
the dialog. The dialog returns the entered text and a boolean value. If
we click the Ok button, the boolean value is true.The text that we have
received from the dialog is set to the line edit widget with setText().
QColorDialog
QColorDialog provides a dialog widget for selecting colour values.
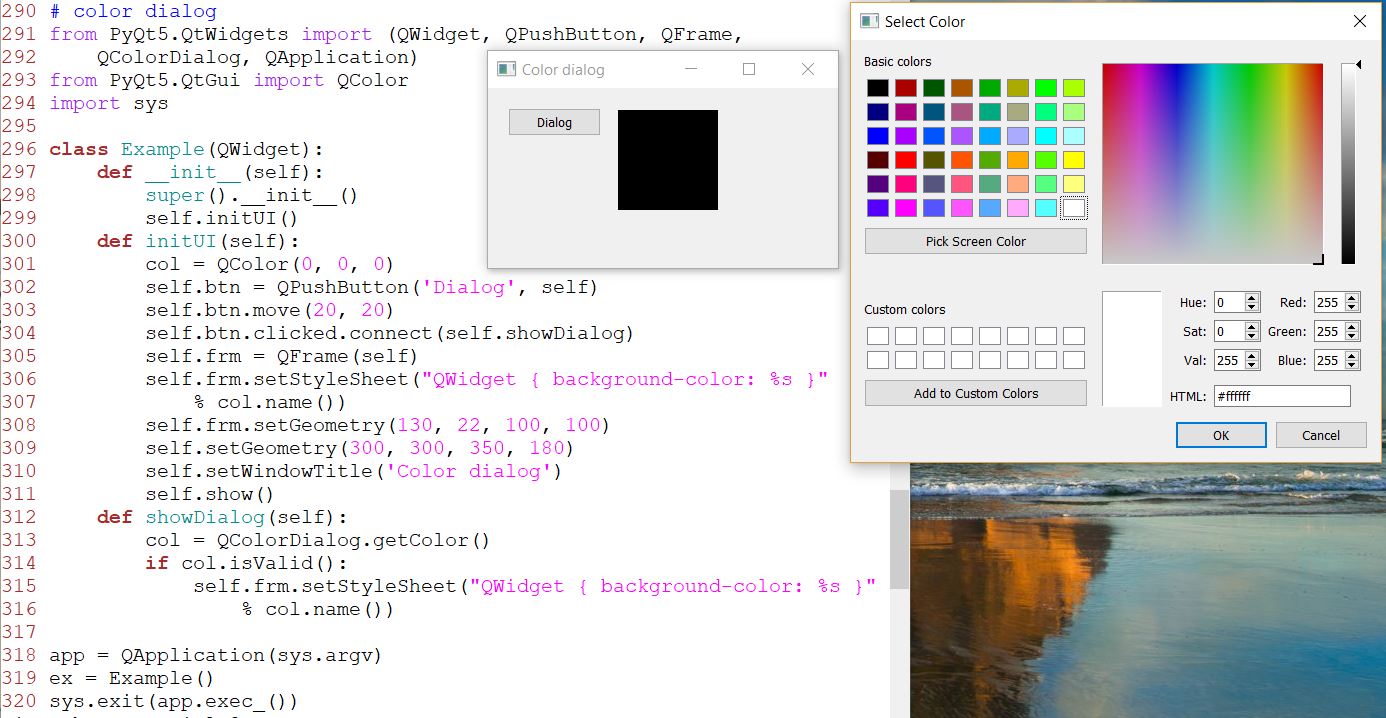
The
application example shows a push button and a QFrame. The widget
background is set to black colour. Using the QColorDialog, we can
change its background. This is an initial colour of the QFrame
background. We check if the colour is valid. If we click on the Cancel
button, no valid colour is returned. If the colour is valid, we change
the background colour using style sheets.
QFontDialog
QFontDialog is a dialog widget for selecting a font.
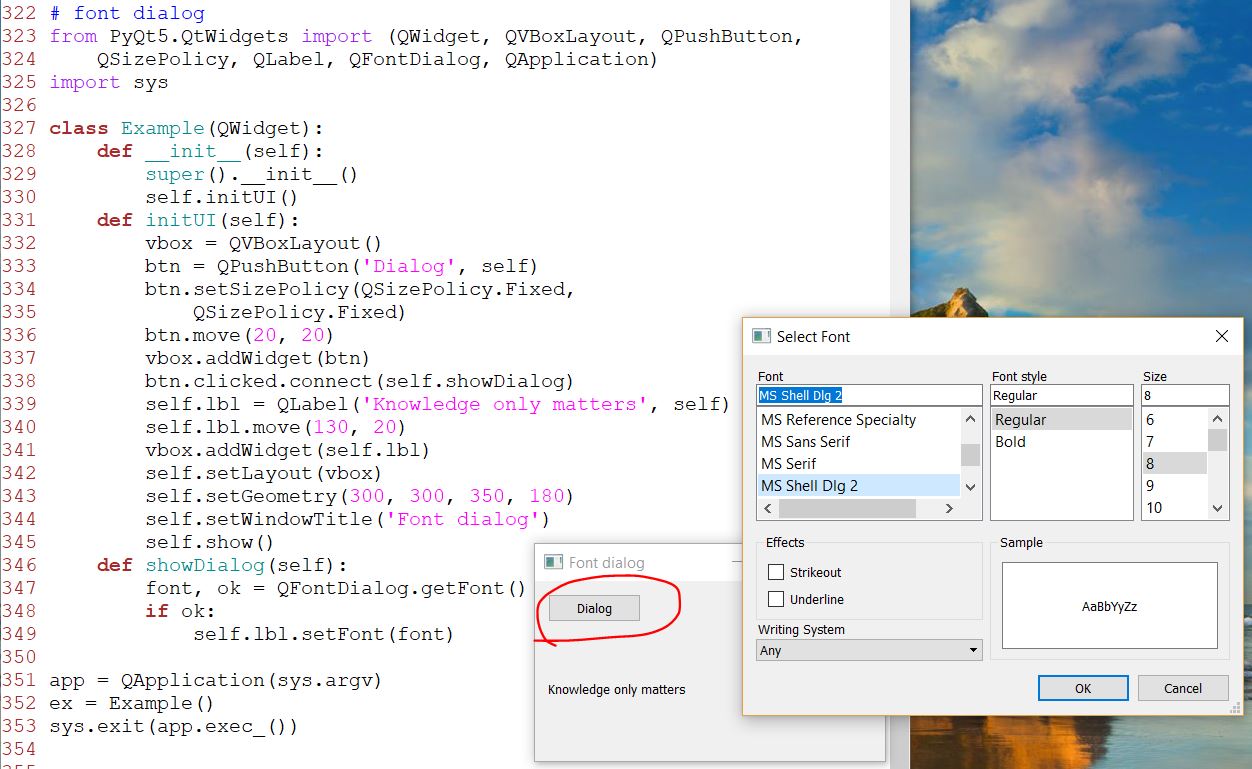
In our example, we have a button and a label. With the QFontDialog, we
change the font of the label.
Here we pop up the font dialog. The getFont() method returns the font
name and the ok parameter. It is equal to True if the user clicked Ok;
otherwise it is False. If we clicked Ok, the font of the label is
changed with setFont().
QFileDialog
QFileDialog is a dialog that allows users to select files or
directories. The files can be selected for both opening and saving.
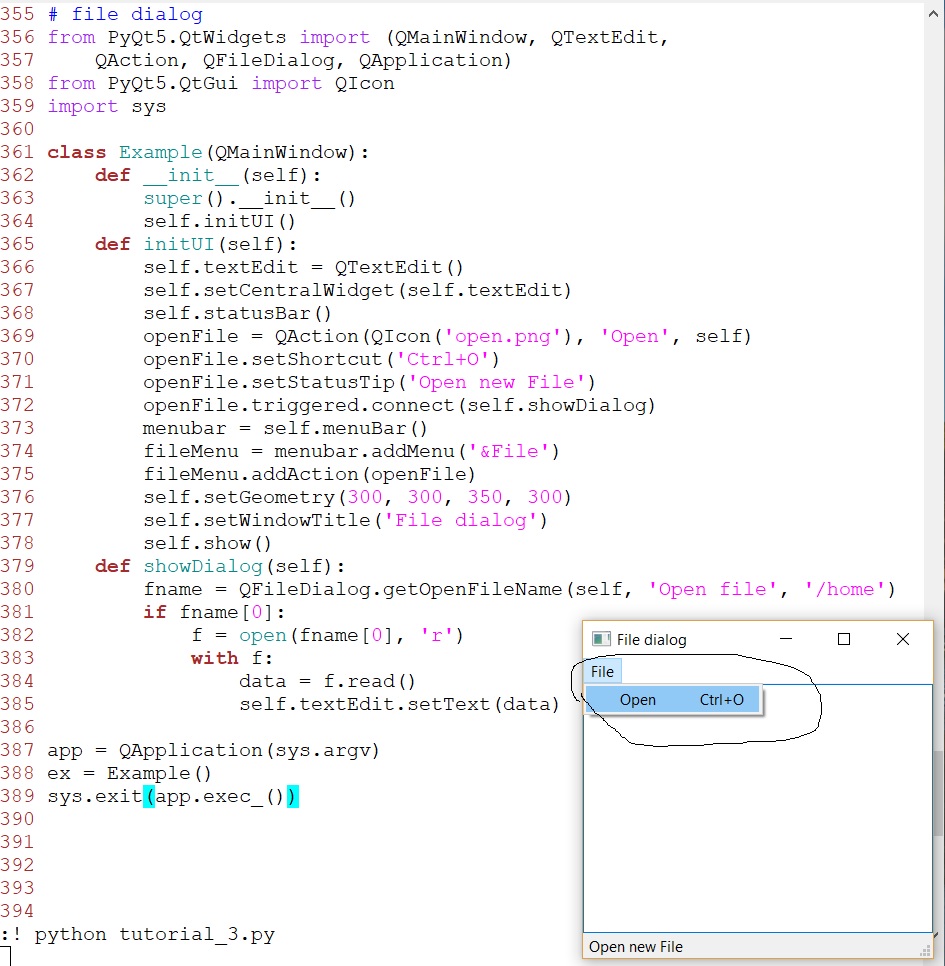
The example shows a menubar, centrally set text edit widget, and a
statusbar. The menu item shows the QFileDialog which is used to select
a file. The contents of the file are loaded into the text edit widget.
The example is based on the QMainWindow widget because we centrally set
a text edit widget.
We pop up the QFileDialog. The first string in the getOpenFileName()
method is the caption. The second string specifies the dialog working
directory. By default, the file filter is set to All files (*). The
selected file name is read and the contents of the file are set to the
text edit widget.
Tasks:
1. Code up all these examples in this tutorial in one .py file and
'push'
it to your GUI repository. Send the link of the repository to the
homework email.