Lecture
34 GUI - PyQt I
1. Introduction:
This is an introductory PyQt5 tutorial. The purpose of
this tutorial is to get you started with the PyQt5 toolkit.
PyQt5
is a set of Python bindings for Qt5 application framework from Digia.
It is available for the Python 2.x and 3.x. This tutorial uses Python
3. Qt library is one of the most powerful GUI libraries. The official
home site for PyQt5 is www.riverbankcomputing.co.uk/news. PyQt5 is
developed by Riverbank Computing. PyQt5 is implemented as a set of
Python modules. It has over 620 classes and 6000 functions and methods.
It is a multiplatform toolkit which runs on all major operating
systems, including Unix, Windows, and Mac OS. PyQt5 is dual licensed.
Developers can choose between a GPL and a commercial license.
PyQt5 modules PyQt5's
classes are divided into several modules, including the following:
QtCore
QtGui
QtWidgets
QtMultimedia
QtBluetooth
QtNetwork
QtPositioning Enginio
QtWebSockets
QtWebKit
QtWebKitWidgets
QtXml
QtSvg
QtSql
QtTest
The
QtCore module contains the core non-GUI functionality. This module is
used for working with time, files and directories, various data types,
streams, URLs, mime types, threads or processes. The QtGui contains
classes for windowing system integration, event handling, 2D graphics,
basic imaging, fonts and text. The QtWidgets module contains classes
that provide a set of UI elements to create classic desktop-style user
interfaces. The QtMultimedia contains classes to handle multimedia
content and APIs to access camera and radio functionality. The
QtBluetooth module contains classes to scan for devices and connect and
interact with them. The QtNetwork module contains the classes for
network programming. These classes facilitate the coding of TCP/IP and
UDP clients and servers by making the network programming easier and
more portable. The QtPositioning contains classes to determine a
position by using a variety of possible sources, including satellite,
Wi-Fi, or a text file. The Enginio module implements the client-side
library for accessing the Qt Cloud Services Managed Application
Runtime. The QtWebSockets module contains classes that implement the
WebSocket protocol. The QtWebKit contains classes for a web browser
implementation based on the WebKit2 library. The QtWebKitWidgets
contains classes for a WebKit1 based implementation of a web browser
for use in QtWidgets based applications.
The QtXml contains
classes for working with XML files. This module provides implementation
for both SAX and DOM APIs. The QtSvg module provides classes for
displaying the contents of SVG files. Scalable Vector Graphics (SVG) is
a language for describing two-dimensional graphics and graphical
applications in XML. The QtSql module provides classes for working with
databases. The QtTest contains functions that enable unit testing of
PyQt5 applications.
2. QDate, QTime,
QDateTime
PyQt5
has QDate, QDateTime, QTime classes to work with date and time. The
QDate is a class for working with a calendar date in the Gregorian
calendar. It has methods for determining the date, comparing, or
manipulating dates. The QTime class works with a clock time. It
provides methods for comparing time, determining the time and various
other time manipulating methods. The QDateTime is a class that combines
both QDate and QTime objects into one object.
Current date and time
PyQt5 has currentDate(), currentTime() and currentDateTime() methods
for determining current date and time.
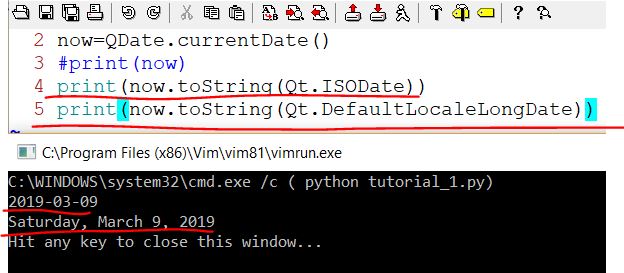
The currentDate() method returns the current date.
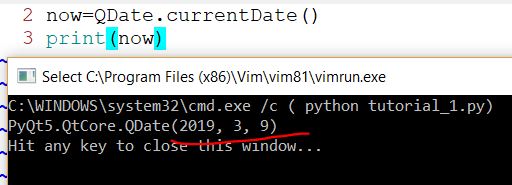
The
date is printed in two different formats by passing the values
Qt.ISODate and Qt.DefaultLocaleLongDate to the toString() method.
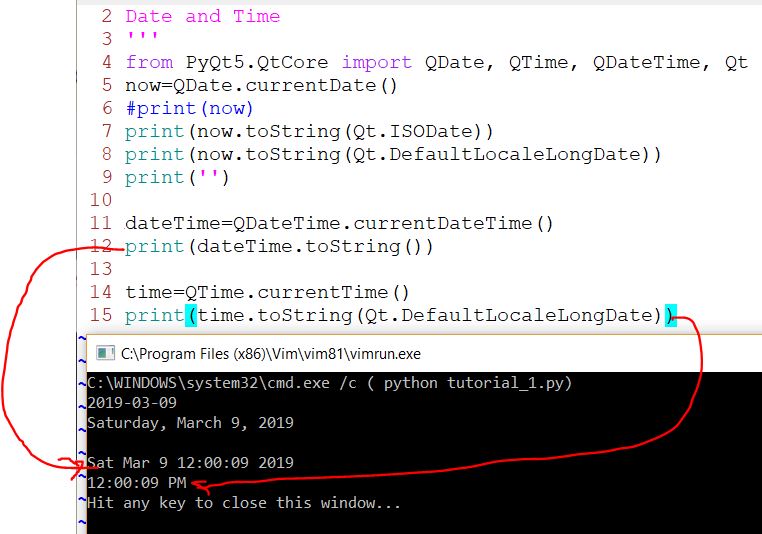
The currentDateTime() returns the current date and time. Finally, the
currentTime() method returns the current time.
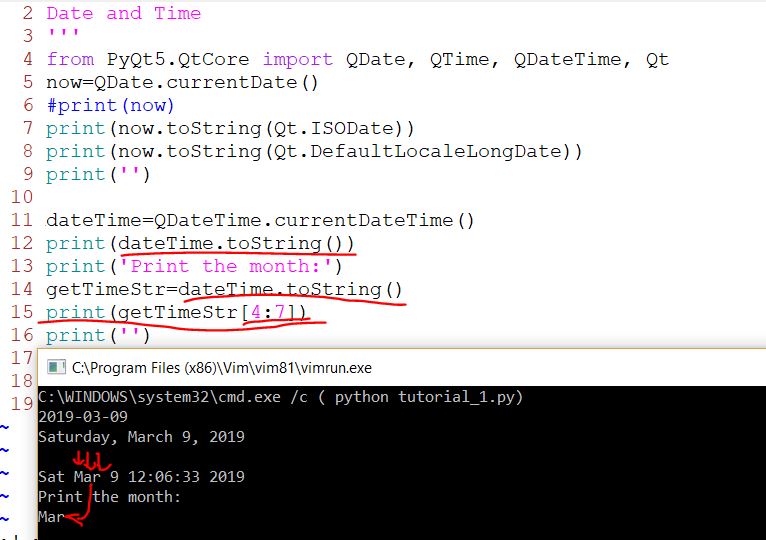
You
don't have to remember and use all these date and time format. However,
I recommend that if you can remember the '.currentDateTime()' method,
you can do string slicing to take any information you are interested in
the output:
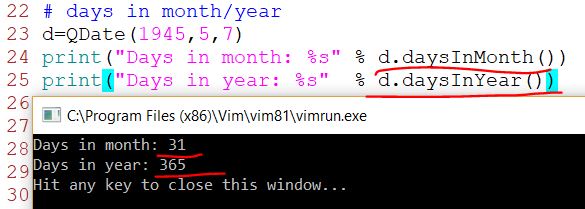
Number of days in a
particular month or year:
The
number of days in a particular month is returned by the daysInMonth()
method and the number of days in a year by the daysInYear() method.
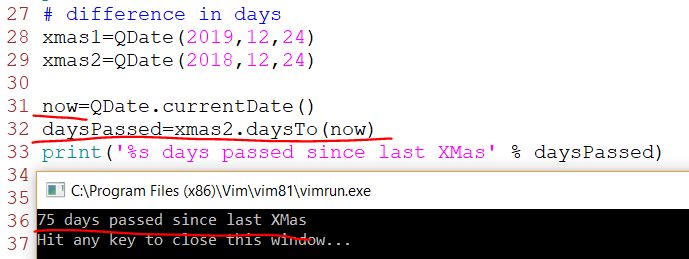
Difference in days:
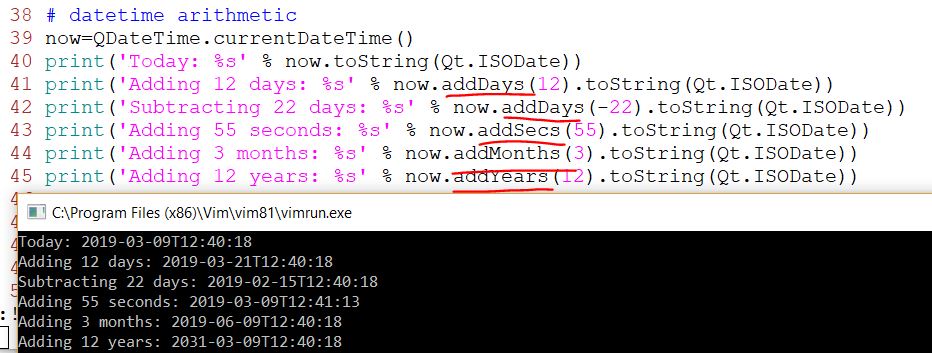
Datetime arithmetic:
We often need to add or subtract days, seconds, or years to a datetime
value.
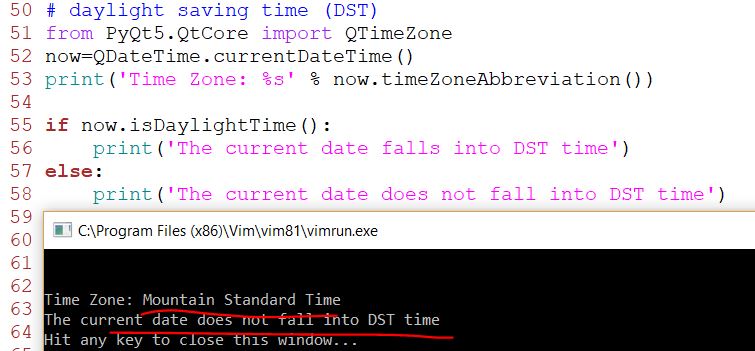
Daylight saving time:
Daylight
saving time (DST) is the practice of advancing clocks during summer
months so that evening daylight lasts longer. The time is adjusted
forward one hour in the beginning of spring and adjusted backward in
the autumn to standard time.
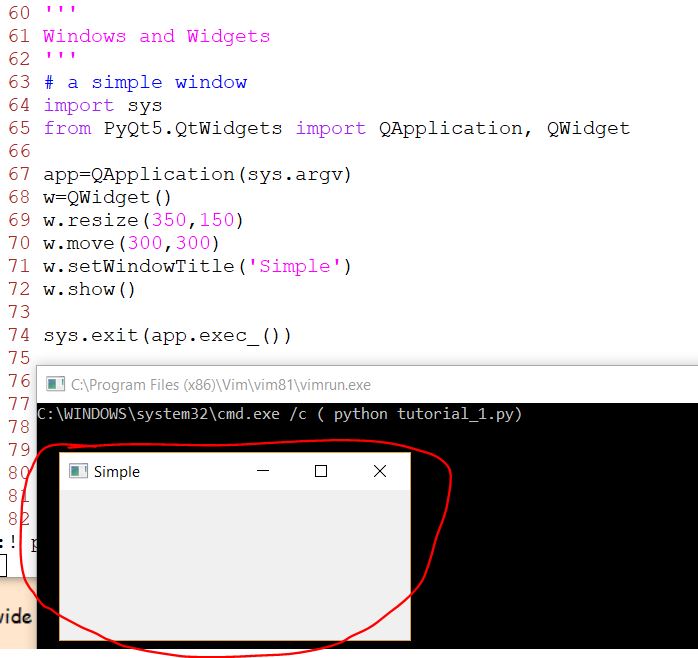
3. The first GUI window
This
is a simple example showing a small window. Yet we can do a lot with
this window. We can resize it, maximise it or minimise it. This
requires a lot of coding. Someone already coded this functionality.
Because it is repeated in most applications, there is no need to code
it over again. PyQt5 is a high level toolkit. If we would code in a
lower level toolkit, the following code example could easily have
hundreds of lines.
The code below shows a small window on the screen. Here we
provide the necessary imports. The basic widgets are located in
PyQt5.QtWidgets module.
Every
PyQt5 application must create an application object. The sys.argv
parameter is a list of arguments from a command line. Python scripts
can be run from the shell. It is a way how we can control the startup
of our scripts.
The QWidget widget is the base class of all user
interface objects in PyQt5. We provide the default constructor for
QWidget. The default constructor has no parent. A widget with no parent
is called a window.
The resize() method resizes the widget. It is 250px wide and 150px high.
The move() method moves the widget to a position on the screen at
x=300, y=300 coordinates.
We set the title of the window with setWindowTitle(). The title is
shown in the titlebar.
The show() method displays the widget on the screen. A widget is first
created in memory and later shown on the screen.
Finally,
we enter the mainloop of the application. The event handling starts
from this point. The mainloop receives events from the window system
and dispatches them to the application widgets. The mainloop ends if we
call the exit() method or the main widget is destroyed. The sys.exit()
method ensures a clean exit. The environment will be informed how the
application ended. The exec_() method has an underscore. It is because
the exec is a Python keyword. And thus, exec_() was used instead.
An application icon:
find
a picture online in the '.png' format. Right click the figure and save
it as 'web.png' to the same directory as your current '.py' file. Use
the following code to add an icon to the window:
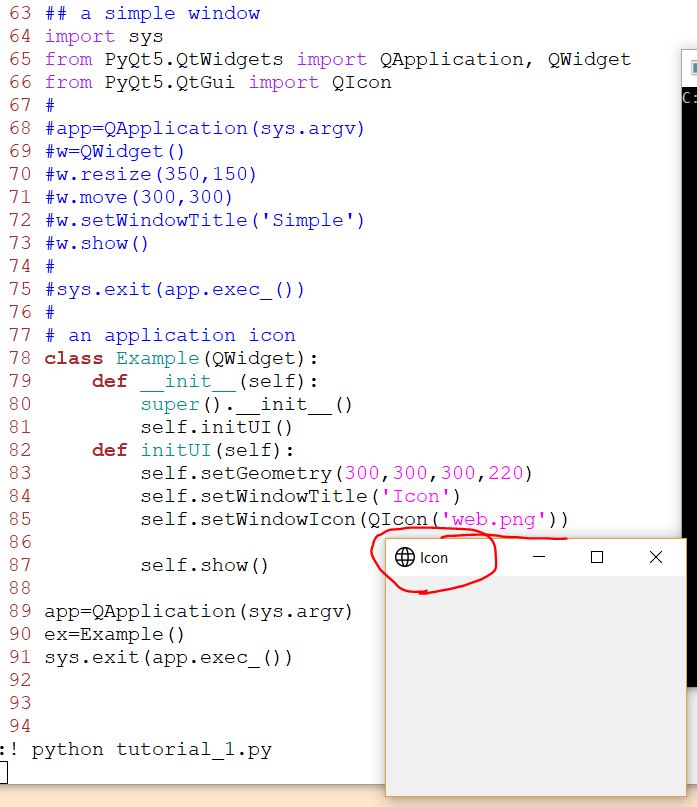
The
previous example was coded in a procedural style. Python programming
language supports both procedural and object oriented programming
styles. Programming in PyQt5 means programming in OOP. Three important
things in object oriented programming are classes, data, and methods.
Here we create a new class called Example. The Example class inherits
from the QWidget class. This means that we call two constructors: the
first one for the Example class and the second one for the inherited
class. The super() method returns the parent object of the Example
class and we call its constructor. The __init__() method is a
constructor method in Python language. The creation of the GUI is
delegated to the initUI() method. All three methods have been inherited
from the QWidget class. The setGeometry() does two things: it locates
the window on the screen and sets it size. The first two parameters are
the x and y positions of the window. The third is the width and the
fourth is the height of the window. In fact, it combines the resize()
and move() methods in one method. The last method sets the application
icon. To do this, we have created a QIcon object. The QIcon receives
the path to our icon to be displayed. The application and example
objects are created. The main loop is started.
A push button:
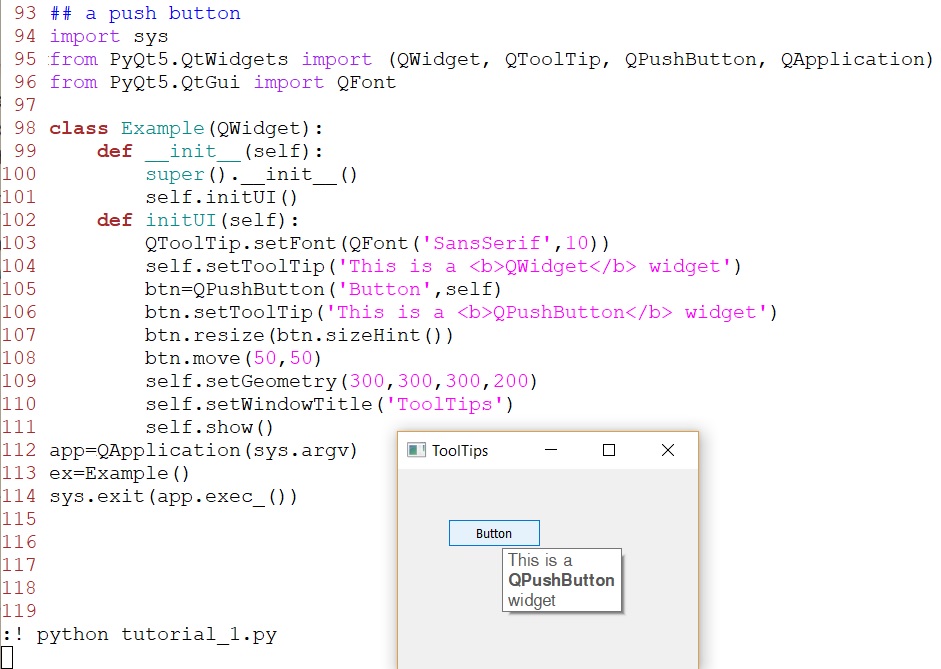
In this example, we show a tooltip for two PyQt5 widgets.
This static method sets a font used to render tooltips. We use a 10pt
SansSerif font. <b>QWidget</b> will bold the font. This is a CSS script.
To create a tooltip, we call the setTooltip() method. We can use rich
text formatting.
We create a push button widget and set a tooltip for it.
The move() method moves the widget to a position on the screen at
x=50, y=50 coordinates.
The button is being resized and moved on the window. The sizeHint()
method gives a recommended size for the button.
Closing a window:
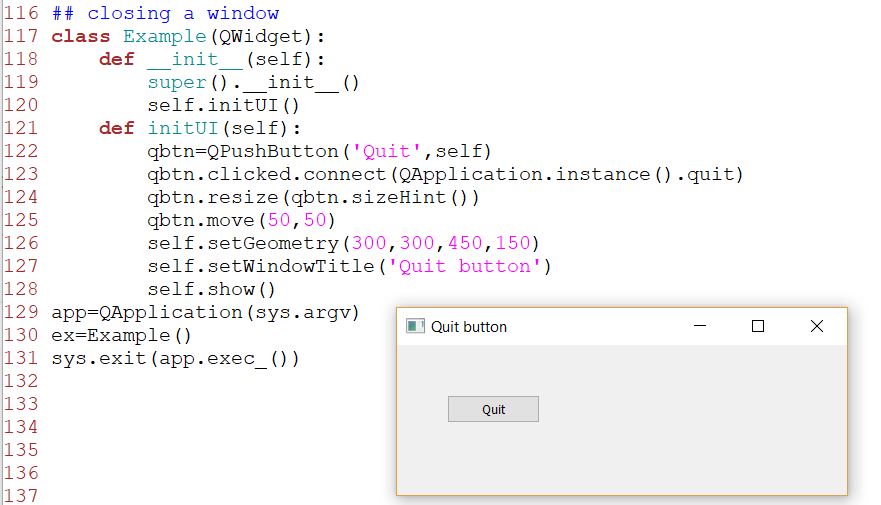
In this example, we create a quit button. Upon clicking on the button,
the application terminates.
We
create a push button. The button is an instance of the QPushButton
class. The first parameter of the constructor is the label of the
button. The second parameter is the parent widget. The parent widget is
the Example widget, which is a QWidget by inheritance.
The event
processing system in PyQt5 is built with the signal & slot
mechanism. If we click on the button, the signal clicked is emitted.
The slot can be a Qt slot or any Python callable. QCoreApplication,
which is retrieved with QApplication.instance(), contains the main
event loop—it processes and dispatches all events. The clicked signal
is connected to the quit() method which terminates the application. The
communication is done between two objects: the sender and the receiver.
The sender is the push button, the receiver is the application object.
Message Box:
By
default, if we click on the x button on the titlebar, the QWidget is
closed. Sometimes we want to modify this default behaviour. For
example, if we have a file opened in an editor to which we did some
changes. We show a message box to confirm the action.
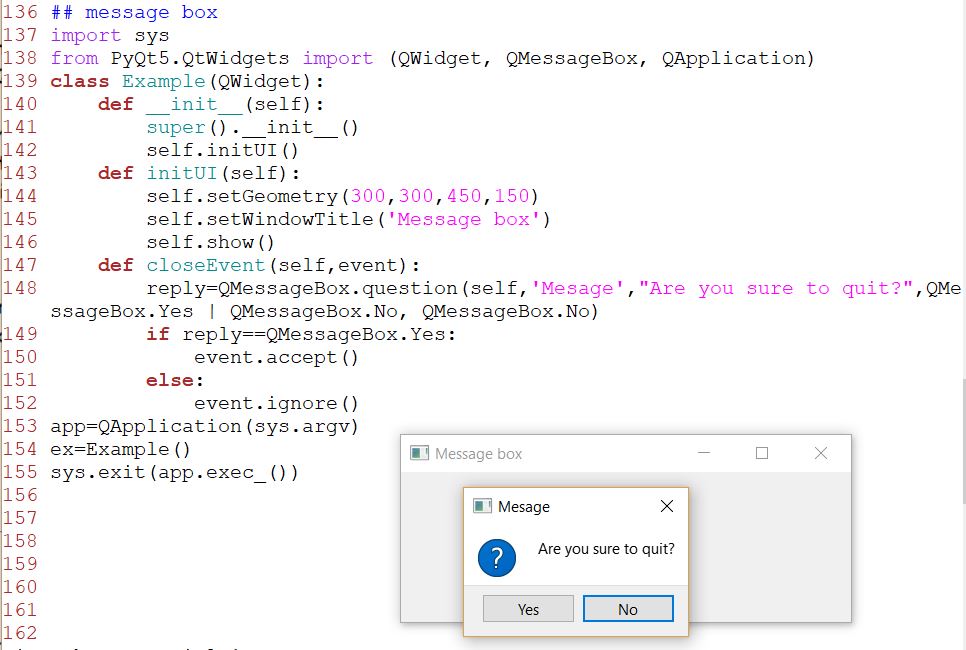
If
we close a QWidget, the QCloseEvent is generated. To modify the widget
behaviour we need to reimplement the closeEvent() event handler.
We
show a message box with two buttons: Yes and No. The first string
appears on the titlebar. The second string is the message text
displayed by the dialog. The third argument specifies the combination
of buttons appearing in the dialog. The last parameter is the default
button. It is the button which has initially the keyboard focus. The
return value is stored in the reply variable.
Centering window on a
screen:
The following script shows how we can center a window on the desktop
screen.
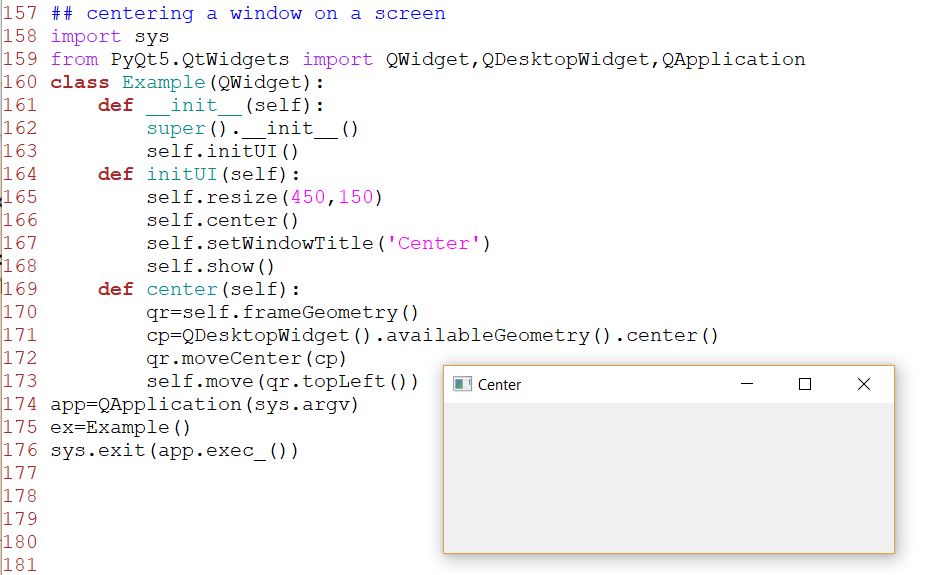
The QDesktopWidget class provides information about the user's desktop,
including the screen size.
The code that will center the window is placed in the custom center()
method.
We get a rectangle specifying the geometry of the main window. This
includes any window frame.
We figure out the screen resolution of our monitor. And from this
resolution, we get the center point.
Our
rectangle has already its width and height. Now we set the center of
the rectangle to the center of the screen. The rectangle's size is
unchanged.
We move the top-left point of the application window
to the top-left point of the qr rectangle, thus centering the window on
our screen.
In this part of the PyQt5 tutorial, we have created simple
code examples in PyQt5.
Tasks:
1. Start a new repository called 'PyQt_GUI' in your GitHub account.
Code up all these examples in this tutorial in one .py file and 'push'
it to your GUI repository. Send the link of the repository to the
homework email.